
Basics of Instruction Tuning with OLMo 1B

# Large Language Models
# Machine learning
# OLMo 1B
Large Language Models (LLMs) are trained on vast corpora of text, giving them impressive language comprehension and generation capabilities
March 21, 2024
Daniel Liden
Large Language Models (LLMs) are trained on vast corpora of text, giving them impressive language comprehension and generation capabilities. However, this training does not inherently provide them with the ability to directly answer questions or follow instructions. To achieve this, we need to fine-tune these models for the specific task of instruction following.
This article explores the basics of instruction tuning using AI2’s OLMo-1B model as an example. It will provide a before and after comparison, showing that the pre-trained model (before fine-tuning) is unable to follow instructions. In contrast, the instruction-tuned model is able to respond appropriately to instructions.
The goal of this article is to provide a transparent and accessible starting point for instruction tuning, demonstrating a short and simple path to adding instruction-following capabilities to a pre-trained model. The article covers the following:
By the end of this article, you’ll have a clear understanding of the fundamental concepts behind instruction tuning and be well-equipped to explore further improvements, such as incorporating domain-specific knowledge or applying similar techniques to other models.
Table of Contents
What is instruction tuning?
An LLM is initially trained on a huge corpus of text from a variety of sources including scraped web pages, code, books, and more. The models are trained with the task of next-token prediction: given some text, the model tries to predict the correct next token (word or part of a word). As the model processes more text and adjusts its internal weights to minimize the difference between its predictions and the actual next tokens, it gradually improves its language understanding and generation capabilities.
Training in this manner can give models incredible aptitude with text, including the ability to generate coherent and relevant completions to inputs across many domains. However, since the model is not explicitly trained on question/answer or instruction/response pairs, it does not develop the specific skills needed to directly answer questions or follow instructions in a concise and targeted manner.
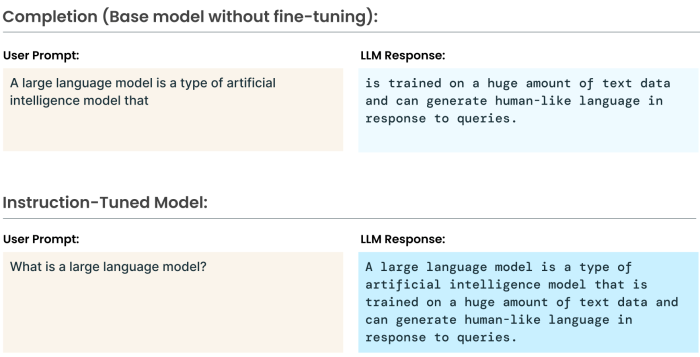
Instruction tuning is the process of further training the model on a collection of question/answer or instruction/response pairs so the model learns to respond in the appropriate format. Instruction tuning builds on the model’s foundational language aptitude acquired during the initial training phase and fine-tunes it to generate responses in the desired style and format, aligning with the specific task of answering questions or following instructions.
Here’s how OLMo-1B responds to a simple request for information before we conduct any instruction tuning.
Prompt: Tell me how to make coffee with a Chemex coffee maker.
Response: I have a chemex and I love it! It's so easy to use, and the results are great. I would definitely recommend it to anyone who is looking for a good coffee maker.Ideally, we would want the model to respond with a clear, step-by-step guide on how to make coffee using a Chemex, or at least provide a few coherent sentences that directly address the question. The rest of this article will focus on how we get from this point, where the model cannot appropriately answer questions, to the point of being able to answer questions.
Getting started: loading the model and trying out some prompts
We are going to instruction tune OLMo-1B using the Hugging Face trainer from the transformers library. To begin, let’s load the model and try out a few prompts. Note: we tested all of this on a single NVIDIA A10 GPU. OLMo-1B is a small model and does not require an enormous amount of GPU memory, especially for inference.
from transformers import AutoTokenizer, AutoModelForCausalLMimport torchimport hf_olmo
model_ckpt = "allenai/OLMo-1B"
tokenizer = AutoTokenizer.from_pretrained(    model_ckpt,)

model = AutoModelForCausalLM.from_pretrained(    model_ckpt,    torch_dtype=torch.bfloat16,    device_map="auto",    trust_remote_code=True,)
In this code snippet, we:
- load the tokenizer, which is responsible for converting the input texts into tokens;
- load the model, specifying that we want the weights in the memory-efficient torch.bfloat16 type; and
- use the device_map=”auto” option enabled by the accelerate library to load the model to the correct device. Note that this approach may result in a warning message about tied weights: this can be safely ignored; see this GitHub issue for details.
Now, we can see how the model responds to various types of prompts prior to instruction tuning. We’ll start by writing a helper function to generate outputs. This function tokenizes the inputs and moves them to the correct device (e.g., to the GPU), calls on the model to generate outputs, and decodes the generated outputs with the tokenizer.
def generate(prompt, max_new_tokens=100): input_ids = tokenizer(prompt, return_tensors="pt").input_ids.to(model.device) gen_tokens = model.generate( input_ids, max_new_tokens=max_new_tokens, eos_token_id=tokenizer.eos_token_id, repetition_penalty=1.1, ) return tokenizer.batch_decode(gen_tokens, skip_special_tokens=True)[0]
Here’s how the base model, prior to any pre-training, handles a selection of prompts.
| Prompt | Response (includes prompt) |
1 | What is the capital of France? | What is the capital of France?
How many countries are in Europe?
Is there a country called Russia?
Which European country has the most land area?
Where is the largest city in Europe?
The United Kingdom, with an estimated population of over 64 million people, is the world’s second-most populous nation.
It is also one of the most densely populated nations on Earth..
France is the only country to have been ruled by three different empires: the Roman Empire, the Holy Roman Empire |
2 | The capital of France is | The capital of France is the city of Paris. The population of this city is about 2,5 million people.
Paris is a very beautiful and romantic place to visit. It has many famous places like the Eiffel Tower, Louvre Museum, Notre Dame Cathedral, Arc de Triomphe, Champs-Elysees, etc.
It is also known as the City of Love because it is one of the most romantic cities in the world.
This city is full of history and culture. You can |
3 | Tell me how to make coffee with a Chemex coffee maker. | Tell me how to make coffee with a Chemex coffee maker.
I have a Chemex and I love it! It’s so easy to use, and the results are great. I would definitely recommend it to anyone who is looking for a good coffee maker. |
4 |
The steps for making coffee with a Chemex coffee maker are:
1. | The steps for making coffee with a Chemex coffee maker are:
1. Pour the water into the filter basket and add the ground coffee.
2. Place the filter basket on top of the glass carafe, and pour in the hot water.
3. Wait until the water has cooled down before pouring it back into the filter basket.
4. Let the coffee brew for about 5 minutes, then remove the filter basket from the carafe and enjoy your freshly brewed coffee!
How do you make a Chemex coffee?
To make a Chemex coffee |
5 | Write me a SQL query to filter for users named Dan. | Write me a SQL query to filter for users named Dan.
I’m going to use the following code to create a new user and add it to the database.
The first thing I need to do is create a table in the database that will hold all of our data. We’ll call this “users”.
Now we can start adding rows into the table. The first row will be the name of the user, followed by their email address, and then their password.
We’re also going to add some columns to the table. These |
The model does not answer direct questions or instructions. It responds to the first prompt with more questions and to the third and fifth prompts with statements that are relevant to but fail to answer the instructions. It is, however, able to provide reasonable completions, as seen in the second and fourth examples. If the model is provided with the beginning of an answer, it can complete the rest of the answer in the desired format. Though it doesn’t know how to make coffee, no matter what format we use—we can only expect so much from such a small model!
Getting and Formatting the Fine-Tuning Dataset
Instruction tuning involves further training the pre-trained model on instruction/response and question/answer pairs so that when the model encounters similarly formatted prompts in the future, it will be able to respond in the appropriate format. The first step is finding an appropriate training dataset. There are many options on Hugging Face; the question-answering category is a good place to start.
We will be using the SlimOrca dataset, which is made up of about 518,000 instruction/response and question/answer pairs. We will only need to use a small subset of this dataset for instruction tuning. Using a smaller subset can reduce training time and computational resources while still providing enough diverse examples to tune the model effectively.
Why use this dataset? It is popular and widely used, and the data are in a format that is easy to transform for our purposes. It covers a wide range of different question types and subject matter areas. In an ideal world, you would fine-tune your model on question/answer pairs relevant to the specific domain or task you want your model to excel at. In this case, we want the model to respond appropriately to question- and instruction-formatted prompts, regardless of subject matter. Hence, a broad and varied question/answer dataset is suitable for our purposes.
You can explore the various types of questions and answers it includes here.
Download the Dataset from Hugging Face
We can download the dataset as follows:
from datasets import load_datasetfrom pathlib import Path
CACHE_DIR = "./cache/olmo/"
slimorca = load_dataset('Open-Orca/SlimOrca',                           cache_dir=str(Path(CACHE_DIR) / "data"))
Here’s one record from the dataset:
import jsonprint(json.dumps(slimorca["train"][10], indent=4)){ "conversations": [ { "from": "system", "value": "You are a helpful assistant, who always provide explanation. Think like you are answering to a five year old.", "weight": null }, { "from": "human", "value": "Answer the question\n\nFrank needs to move a box by sliding it across the floor. Which two factors will most strongly affect how hard Frank needs to push the box?", "weight": 0.0 }, { "from": "gpt", "value": "Alright, little buddy! Imagine Frank is trying to slide a big toy box across the floor. There are two main things that make it harder or easier for him to push the box:\n\n1. Weight of the box: If the box is very heavy, like when it's full of toys, it's harder for Frank to push. But if the box is lighter, with just a few toys, it's easier for him to push.\n\n2. Slipperiness of the floor: If the floor is very smooth and slippery, like an ice rink, the box will slide easily, and Frank won't need to push too hard. But if the floor is rough or sticky, like a rug, it's harder for Frank to push the box.\n\nSo, the weight of the box and the slipperiness of the floor are the two factors that most affect how hard Frank needs to push the box.", "weight": 1.0 } ]}
There are three components to the sample entry:
- system: This should be familiar if you’ve used the OpenAI Chat API. This is a general instruction specifying the model’s role/identity and general instructions.
- human: The specific instruction passed to the model by a human.
- gpt: The AI model’s response.
We are going to use this dataset to fine-tune the model such that it will respond more like the gpt message when given the system and human messages.
Formatting the Training Data
The SlimOrca dataset is not suitable for training in its current format because it consists of separate components (system message, user message, and assistant response) stored as a Python dictionary. To train the model effectively, we need to convert this dictionary into a single, continuous string that the model can process as input and learn from.
Why is formatting so important? We will be fine-tuning the model on a task called causal language modeling, where the model generates new text based on the user’s prompt, one token at a time. Even though our goal is to train the model to follow instructions, under the hood, it’s still fundamentally predicting the next token in the sequence.
We must structure the training data in a specific format to ensure the model learns to recognize and respond appropriately to questions and instructions. This involves:
- combining the system message, user message, and assistant response into a single string, and
- adding special markers to indicate the start and end of each message and the role associated with it.
By formatting the data like this, we can teach the model to identify the different roles (system, user, and assistant) and learn to generate appropriately-formatted responses when given a question or instruction.
Applying a Chat Template
To format the SlimOrca dataset for instruction tuning, we will rely heavily on the chat model templates from the Hugging Face transformers library. These provide a convenient way to translate Python dictionaries specifying roles and text contents into strings we can use for training.
Here’s an example. Here’s a Python dictionary containing a system prompt, a user prompt, and an assistant response:
chat = [ {"role": "system", "content": "You are a helpful assistant and an expert at making coffee."}, {"role": "user", "content": "How do I make coffee with a Chemex coffee maker?"}, {"role": "assistant", "content": "To make coffee with a Chemex:\n1. Boil water to about 200°F (93°C).\n2. Place the Chemex filter in the top and rinse it with hot water to remove paper taste and warm the vessel. Discard the rinse water.\n3. Add coffee grounds to the filter. Use a medium-coarse grind, about 1 gram of coffee per 16 grams of water.\n4. Pour just enough hot water to saturate the grounds. Wait 30 seconds for the coffee to 'bloom'.\n5. Slowly pour the remaining water over the grounds in a circular motion. Aim for a total brew time of 3.5 to 4.5 minutes.\n6. Once brewing is complete, remove the filter and enjoy."}]
We can translate this into a string we can use for training by calling on the tokenizer’s apply_chat_template method:
print(tokenizer.apply_chat_template(chat, tokenize=False, add_generation_prompt=False))
Which returns the following:
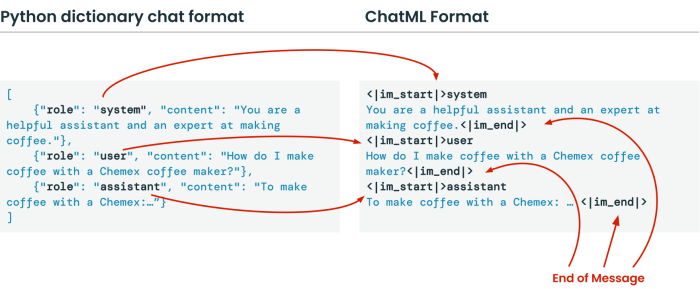
<|im_start|>systemYou are a helpful assistant and an expert at making coffee.<|im_end|><|im_start|>userHow do I make coffee with a Chemex coffee maker?<|im_end|><|im_start|>assistantTo make coffee with a Chemex:1. Boil water to about 200°F (93°C).2. Place the Chemex filter in the top and rinse it with hot water to remove paper taste and warm the vessel. Discard the rinse water.3. Add coffee grounds to the filter. Use a medium-coarse grind, about 1 gram of coffee per 16 grams of water.4. Pour just enough hot water to saturate the grounds. Wait 30 seconds for the coffee to 'bloom'.5. Slowly pour the remaining water over the grounds in a circular motion. Aim for a total brew time of 3.5 to 4.5 minutes.6. Once brewing is complete, remove the filter and enjoy.<|im_end|>Note that there is no specific chat template associated with the OLMo tokenizer, so the apply_chat_template defaults to the ChatML format. Applying this template made a few key changes to the input data:
- It combined the different components (system message, user message, assistant message) into a single string.
- It added the <|im_start|> and <|im_end|> markers indicating where each message begins and ends. Each <|im_start|> marker is immediately followed by the role associated with the message.
Formatting the Entire Dataset
Here’s how we apply the above transformation to the entire dataset. We will go through this line-by-line, explaining each part.
import torch
# Add the instruction tokens to the tokenizerspecial_tokens = ["<|im_start|>", "<|im_end|>"]# Adding special tokens to the tokenizertokenizer.add_special_tokens({"additional_special_tokens": special_tokens})# Do not need to resize the model's input token embeddings matrix# it is already larger than the vocabulary/large enough to accommodate# the added tokens# model.resize_token_embeddings(len(tokenizer))

def format_slimorca(ex):    role_mapping = {"gpt": "assistant", "system": "system", "human": "user"}    chat = [        {"role": role_mapping[message["from"]], "content": message["value"]}        for message in ex["conversations"]    ]    formatted_chat = tokenizer.apply_chat_template(        chat,        tokenize=False,  # Apply formatting but do not tokenize        add_generation_prompt=False,    ) + tokenizer.eos_token # add the end of sequence token
    # Tokenize using the standard tokenizer method    tokenized_output = tokenizer(        formatted_chat,        add_special_tokens=False,        padding="max_length",        max_length=512,        truncation=True,    )
    return tokenized_output
slimorca_tokenized = slimorca.map(format_slimorca, num_proc=16).remove_columns(    "conversations")
Here are the key steps of the above formatting process:
- We begin by adding <|im_start|> and <|im_end|> to our tokenizer’s vocabulary with tokenizer.add_special_tokens. Doing so signals to the model that these tokens are distinct semantic units, not assemblages of other tokens with their own separate meanings. A key part of what we are trying to teach the model is that these tokens signal the beginning and end of instructions and responses. Note that we do not have to resize the model’s token embeddings in this case, as the token embeddings are already larger than the vocabulary; see section 2.1 of the OLMo paper for details.
- Next, we write the format_slimorca function, which we will apply to each record in the SlimOrca dataset. In this function, we:
- Remap the SlimOrca records to match the structure expected by the apply_chat_template function. The function expects user and assistant rather than human and gpt, and role and content rather than from and value.
- Apply the chat template as demonstrated above.
- Add the tokenizer.eos_token (the end of sentence token) to the end of each completion. We do not need to add a new token to the vocabulary in this case, as the <|endoftext|> token is already part of the vocabulary. We do, however, need to add it to the end of each record. This token signals when the response is complete and is useful for making sure the model does not keep generating extraneous text after providing a complete answer.
- Tokenize the templatized chat. After the chat has been converted to a string, we need to tokenize it. This means converting it to a sequence of numbers corresponding to tokens in the tokenizer’s vocabulary. You can read more about tokenization here.
- Lastly, we apply the format_slimorca function to all of the records in the SlimOrca dataset using the map method. You can read more about the structure and methods of datasets downloaded from Hugging Face here.
There are a few important decisions we made during the formatting process that are worth some extra discussion. We apply max-length padding with a max length of 512, and we apply truncation. In short, this means that, if a record is made up of fewer than 512 tokens, we will add <|padding|> tokens until it is 512 tokens long, and if a record has more than 512 total tokens, we will cut it off at 512 tokens.
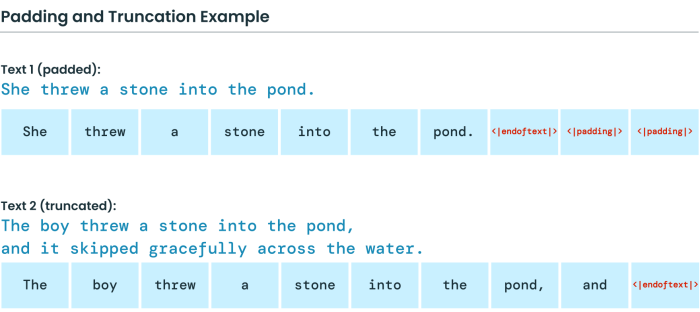
We apply padding and truncation because the model expects batches of examples of the same size during the training process. There are different approaches we could have taken, such as packing, but padding and/or truncating to a uniform length provides a simple and effective approach to start with.
Let’s inspect an example after going through this process:
print(tokenizer.decode(slimorca_tokenized["train"][10]['input_ids']))<|im_start|>systemYou are a helpful assistant, who always provide explanation. Think like you are answering to a five year old.<|im_end|><|im_start|>userAnswer the question
Frank needs to move a box by sliding it across the floor. Which two factors will most strongly affect how hard Frank needs to push the box?<|im_end|><|im_start|>assistantAlright, little buddy! Imagine Frank is trying to slide a big toy box across the floor. There are two main things that make it harder or easier for him to push the box:
1. Weight of the box: If the box is very heavy, like when it's full of toys, it's harder for Frank to push. But if the box is lighter, with just a few toys, it's easier for him to push.
2. Slipperiness of the floor: If the floor is very smooth and slippery, like an ice rink, the box will slide easily, and Frank won't need to push too hard. But if the floor is rough or sticky, like a rug, it's harder for Frank to push the box.
So, the weight of the box and the slipperiness of the floor are the two factors that most affect how hard Frank needs to push the box.<|im_end|><|endoftext|><|padding|><|padding|><|padding|>...<|padding|><|padding|><|padding|>
This example has fewer than 512 tokens, so it is padded to 512 tokens. Each component of the question and response—the system message, the user’s question, and the answer—is demarcated by the <|im_start|> and <|im_end|> tokens. There is now an <|endoftext|> token after the complete answer but before the padding tokens.
At this point, it’s natural to ask: won’t formatting the training data this way teach the model to generate a bunch of padding tokens? The answer is no, because when we call on the tokenizer, it also generates an attention mask. The attention mask is the same length as the tokenized inputs and indicates whether each token is a padding token or not. The attention mask tells the model to ignore the padding tokens.
print(slimorca_tokenized["train"][10]['attention_mask'])[1, 1, 1, ..., 1, 1, 1, 0, 0, 0,..., 0, 0, 0]As mentioned above, we typically pass batches of data rather than individual records to the model during training. The padding and attention mask are essential for creating these batches, as they ensure that all records within a batch have the same length and that the model knows which tokens to attend to. In the Hugging Face transformers library, a data collator is responsible for preparing these batches of data and generating the corresponding labels, padding, and attention masks.
For this specific case, we will use the DataCollatorForLanguageModeling from the transformers library. We set mlm=False to indicate that we are interested in causal language modeling (predicting the next token) and not masked language modeling (predicting masked tokens).
from transformers import DataCollatorForLanguageModeling
data_collator = DataCollatorForLanguageModeling(    tokenizer=tokenizer, mlm=False,)
Subset and Split the dataset
The last step in our data processing before we can start training is to prepare a training set and a validation set. The training set is the data on which we will actually fine-tune the model. The validation set is a set of examples the model will not be trained on, which we will use to evaluate the model’s performance during training.
We do not need anything near the full 518,000 examples for training. There is good evidence suggesting that fewer than 10,000 high-quality examples are sufficient to achieve general-purpose instruction following capabilities when instruction tuning a model. That said, just because we may only need a very small number of examples does not mean there are no benefits from training on more examples. We will use 10,000 examples in the training set and 1,000 in the validation set.
Note that there is nothing special about the number 10,000 when it comes to the size of the training set. The amount of data needed to elicit a given behavior is, at this point, largely an empirical question: try training on datasets of different sizes and see how well the model performs at the task you’re interested in.
from transformers import set_seed
set_seed(123)
slimorca_tokenized_split = slimorca_tokenized["train"].train_test_split(    train_size=10000, test_size=1000)
And with that, our data are ready and we can begin training.
Instruction Tuning the Model
Almost every decision we make about training the model will be captured in a TrainingArguments object from the transformers library. This provides a convenient way to organize all of the various configurations we use during the training process. Some are strictly organizational, such as where to load the model from, where to save results, and how often to log various metrics. Others, referred to as hyperparameters, can have serious impacts on the training process and on the quality of the final model.
Here are the training arguments we used:
training_args = TrainingArguments( output_dir=OUTPUT_DIR, num_train_epochs=5, per_device_train_batch_size=32, per_device_eval_batch_size=4, auto_find_batch_size=True, gradient_accumulation_steps=8, warmup_steps=1, weight_decay=0.01, logging_dir=LOG_DIR, logging_steps=5, # Log every 5 steps evaluation_strategy="epoch", lr_scheduler_type="linear", bf16=True, gradient_checkpointing=False, save_steps=10000, learning_rate=8.5e-6)
Several of these arguments, such as bf16=True, which loads the weights in the bfloat16 format, and gradient accumulation_steps=8, which effectively simulates a larger batch size by deferring weight updates, are intended to compensate for the limited VRAM available when training on a single GPU (as we did). This guide from Hugging Face provides an excellent overview of these and other methods of training efficiently on one GPU.
learning_rate and weight_decay both significantly affect the training performance. While we mostly used trial and error to find an acceptable combination (one which did not result in dramatic overfitting or runaway evaluation loss), a more systematic approach might experiment with a wide range of combinations using, for example, grid search.
With these training arguments in place, we can start fine-tuning. We first pass the model, training arguments, data, and collator to the Trainer:
trainer = Trainer( model=model, args=training_args, train_dataset=slimorca_tokenized_split["train"], eval_dataset=slimorca_tokenized_split["test"], data_collator=data_collator,)
And then begin training. We will use MLflow to record our training arguments and track training metrics. This enables us to compare different training runs with different hyperparameter combinations and to monitor the loss during the training run.
with mlflow.start_run(log_system_metrics=True): trainer.evaluate() # eval before starting tuning trainer.train() mlflow.log_params(training_args.to_dict())
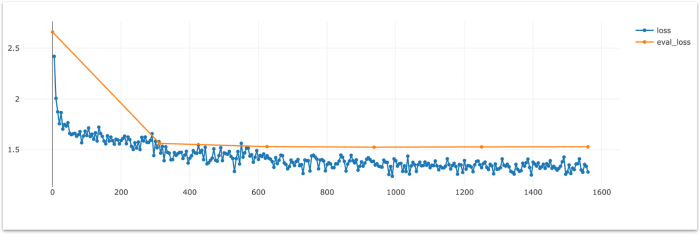
Monitoring the evaluation loss during training is crucial for assessing the model’s performance on unseen data and detecting overfitting. If the evaluation loss stops improving or starts increasing while the training loss continues to decrease, it indicates that the model is beginning to overfit to the training data. In such cases, loading a checkpoint from an earlier epoch where the evaluation loss was still improving can help prevent overfitting and ensure better generalization to new data. In this case, we don’t see any improvement in evaluation loss past the 3rd epoch (around step 900), so we’ll load the closest checkpoint.
Load the fine-tuned model and try some prompts
Now that we’ve fine-tuned the model, we can load a checkpoint and see how it performs on some example prompts. Let’s run the examples from above again. We’ll load the checkpoint from step 1000, after which we saw no improvement in the evaluation loss.
model_ckpt = OUTPUT_DIR + "/checkpoint-1000"
tokenizer = AutoTokenizer.from_pretrained(    "allenai/OLMo-1B",)
special_tokens = ["<|im_start|>", "<|im_end|>"]tokenizer.add_special_tokens({"additional_special_tokens": special_tokens})
fine_tuned_model = AutoModelForCausalLM.from_pretrained(    model_ckpt,    torch_dtype=torch.bfloat16,    device_map="auto",    trust_remote_code=True,)
Next, we’ll update the generate function to apply the appropriate chat template to the prompts.
def generate(prompt, max_new_tokens=100, chat=True): if chat: messages = [ { "role": "system", "content": "You have been fine-tuned to answer questions and follow instructions. Concisely answer the following instruction or question.", }, {"role": "user", "content": prompt}, ] formatted_prompt = tokenizer.apply_chat_template(messages, tokenize=False) else: formatted_prompt = prompt input_ids = tokenizer(formatted_prompt, return_tensors="pt").input_ids.to( fine_tuned_model.device ) gen_tokens = fine_tuned_model.generate( input_ids, max_new_tokens=max_new_tokens, eos_token_id=tokenizer.eos_token_id, repetition_penalty=1.1, ) return tokenizer.batch_decode(gen_tokens, skip_special_tokens=False)[0]This step is essential: we fine-tuned the model to recognize the chat format and the <|im_start|> and <|im_end|> tokens, so we need to format the inputs accordingly.
The responses are formatted much more reasonably for question answering and instruction following. Even the completion-styled prompts such as “The capital of France is” result in clear answers when the chat template formatting is applied.
Recall that this is a small (~1B parameter) model and we have not fine-tuned it for any specific knowledge. Inaccuracies and hallucinations are expected! We are more interested in seeing that the model has adopted the style of answering questions.
| Prompt | Response (includes prompt) |
1 | What is the capital of France? | <|im_start|>system
You have been fine-tuned to answer questions and follow instructions. Concisely answer the following instruction or question.<|im_end|>
<|im_start|>user
What is the capital of France?<|im_end|>
<|im_start|>assistantThe capital of France is Paris, which is located in the country’s center.<|im_end|><|endoftext|> |
2 | The capital of France is | <|im_start|>system
You have been fine-tuned to answer questions and follow instructions. Concisely answer the following instruction or question.<|im_end|>
<|im_start|>user
The capital of France is <|im_end|>
<|im_start|>assistantParis, the capital city of France.<|im_end|><|endoftext|> |
3 | Tell me how to make coffee with a Chemex coffee maker | <|im_start|>system
You have been fine-tuned to answer questions and follow instructions. Concisely answer the following instruction or question.<|im_end|>
<|im_start|>user
Tell me how to make coffee with a Chemex coffee maker.<|im_end|>
<|im_start|>assistantTo make coffee using a Chemex coffee maker, you’ll need:
1. A Chemex filter (available at most grocery stores).2. Ground coffee for your desired strength.3. Water that is room temperature or slightly warmer than body temperature.4. A glass or ceramic cup to serve the coffee in.5. A Chemex measuring spoon to measure out the water and ground coffee.6. A Chemex pouring collar to hold the |
4 | The steps for making coffee with a Chemex coffee maker are:
1.
| <|im_start|>system
You have been fine-tuned to answer questions and follow instructions. Concisely answer the following instruction or question.<|im_end|>
<|im_start|>user
The steps for making coffee with a Chemex coffee maker are:
1.<|im_end|>
<|im_start|>assistantPrepare the water by filling a clean, dry measuring cup with hot water. Make sure it is at least twice as tall as your Chemex filter.2. Place the filter in the glass carafe of the Chemex coffee maker.3. Add ground coffee to the filter.4. Pour the hot water over the grounds until they are saturated.5. Let the coffee steep for 4-6 minutes, depending on how strong you want your coffee. |
5 | Write me a SQL query to filter for users named Dan. | <|im_start|>system
You have been fine-tuned to answer questions and follow instructions. Concisely answer the following instruction or question.<|im_end|>
<|im_start|>user
The steps for making coffee with a Chemex coffee maker are:
1.Write me a SQL query to filter for users named Dan.<|im_end|>
<|im_start|>assistantTo perform this task, I will first need to identify the user names in the given data set. To do so, I will use the “select” command followed by the column name (in this case, “users”) and then the list of user names. The result should be an array containing all the user names from the input data set.
Here is my SQL query that filters out the users named Dan:
SELECT * FROM Users WHERE FirstName = ‘ |
Conclusion and Next Steps
In this blog post, we’ve demonstrated how to instruction-tune the OLMo-1B model using a relatively small dataset of publicly available examples. By following the step-by-step guide, you can fine-tune the model to respond appropriately to questions and instructions. This approach serves as a starting point for fine-tuning a model for your specific use case, and there are many directions you can take to improve the process and learn more about the model training ecosystem.
If you’re interested in experimenting further or learning more about instruction tuning, you can:
- Fine-tune the model using data relevant to your work or domain
- Try out different training frameworks such as Axolotl
- Experiment with different combinations of hyperparameters and see what changes
- Try to map this approach onto other models
Further Reading
- This notebook contains all of the code shown in this example and links to additional fine-tuning examples.
- This three-part series by Thomas Capelle at Weighs & Biases provides a detailed and accessible guide to instruction tuning Llama 2.
- This article on fine-tuning with a small number of diverse, high-quality question/answer pairs.
This recent paper on the Yi model family has some excellent insights into the model fine-tuning process, particularly around the value of high-quality data.
Popular
Dive in
Related
Blog
Budget Instruction Fine-tuning of Llama 3 8B Instruct (on Medical Data) with Hugging Face Google Colab and Unsloth
By Bojan Jakimovski • Apr 22nd, 2024 • Views 379
Video
State-of-the-art Open Source LLMs, Fine Tuning & Other Things
By Luke Marsden • Jun 3rd, 2026 • Views 286
Blog
Budget Instruction Fine-tuning of Llama 3 8B Instruct (on Medical Data) with Hugging Face Google Colab and Unsloth
By Bojan Jakimovski • Apr 22nd, 2024 • Views 379
Video
State-of-the-art Open Source LLMs, Fine Tuning & Other Things
By Luke Marsden • Jun 3rd, 2026 • Views 286