
Hackathon Speedrun: Build & Deploy a RAG App in Minutes with Vertex AI Studio & Vertex AI Search!
# Data Science
# Machine Learning
# Generative AI Tools
# Artificial Intelligence
# Retrieval Augmented Generation System
Build a RAG app fast for your hackathon! Learn to quickly deploy a grounded LLM application using Vertex AI Studio, Vertex AI Search, and Cloud Run
May 27, 2025
Médéric Hurier
Hackathon clock ticking? Need to get a Retrieval Augmented Generation (RAG) app up and running fast using your company’s knowledge base? Forget complex setups! Google Cloud’s Vertex AI Studio and Vertex AI Search are your secret weapons for building and deploying a grounded LLM application in what feels like minutes.
Let’s walk through how to built a Q&A assistant for “Agentoc: A2A and MCP” based on the most well known agent protocol documentations. You can adapt this for any dataset!
The Goal: Quickly create an AI assistant that can answer questions based on a specific set of documents, providing context from the source material.
The Stack:
- Google Cloud Storage (GCS) : To store our source documents.
- Vertex AI Search (within AI Applications) : To index our documents and make them searchable.
- Vertex AI Studio : To create our prompt, connect it to the Vertex AI Search data store (grounding), and test.
- Cloud Run : To deploy our AI assistant as a web app with a single click.

Architecture of Agentoc: Assistant for A2A and MCP protocol
Step 1: Prepare Your Data in Cloud Storage
First, we need a knowledge base. For this example, we got a set of documents about our A2A and MCP protocols from GitHub repositories.
1. Create a GCS Bucket:
Navigate to Cloud Storage -> Create Bucket.
Give it a globally unique name (e.g., agentoc-data-sources like I did).
Choose your location and storage class (standard is fine for this).

Creation of the Cloud Storage Bucket
2. Format & Upload Your Data:
For Vertex AI Search, one of the easiest ways to provide structured and unstructured data is using JSON Lines (.jsonlines) format. Each line is a JSON object. You can use a script like this one to prepare the data. Alternatively, you can just import “unstructured documents”

The resulting metadata.jsonlines file looked something like this (each document on a new line):
Make sure the URI points to the actual files (txt, pdf, html etc.) also uploaded to your bucket. I uploaded my metadata.jsonlines and the referenced documents into my agentoc-data-sources bucket.
Step 2: Create a Vertex AI Search Data Store
This is where the magic of making your data “searchable” by the LLM happens.
1. Navigate to Data Stores:
In the Google Cloud Console, go to the main navigation menu -> “AI Applications” -> “Data Stores”.
Click “Create Data Store”.

Vertex AI Search under the Vertex AI Section
2. Select Data Source: Choose “Cloud Storage”.

Choice of Data Store in Vertex AI Search
3. Configure Data Import:

Configuration for importing data from the Cloud Storage Bucket
Specify the GCS URI of your metadata.jsonlines file (e.g., gs://agentoc-data-sources/metadata.jsonlines).
What kind of data are you importing? I selected “Linked unstructured documents (JSONL with metadata)” because my metadata.jsonlines file points to other documents.
Synchronization frequency: For a hackathon, “One time” is perfect.
Click “Continue”.
4. Configure your Data Store:

Configuration of the Data Store
Location: I chose “global (Global)” for wide accessibility.
Data store name: Give it a descriptive name, like “agentoc-data-sources”.
Click “CREATE”.
5. Wait for Indexing: Google will now process and index your documents. You can see the status on the Data Stores page. Once it’s done, you’ll see the number of documents processed (and potential errors).

Result of the indexing process in the Data Store
6. Check the list of Data Store: you should see the name of your data store.

List of Data Store created
Note: you will need the Data Store ID and Location for the next section
Step 3: Craft and Ground Your Prompt in Vertex AI Studio
Now, let’s build the brain of our assistant.
1. Navigate to Vertex AI Studio:

Get Started with Vertex AI Studio and API Activation
Main navigation menu -> “Vertex AI” -> “Vertex AI Studio” -> “Create prompt”.
You might be asked to enable some APIs if it’s your first time. Agree and continue.
2. Select Model & Write System Instructions:
Model: I chose gemini-2.0-flash-001 for its speed and capability.
System Instructions: Give your AI a personality and purpose. Example: “You are Agentoc, an helpful assistant that provides grounded answers about the A2A and MCP protocols from the official documentation.”
3. Enable Grounding:

Activation of ground with Vertex AI Search
Under “Tools”, toggle ON “Grounding: Vertex AI Search”.
Click the pencil icon (Edit) to configure.
4. Configure Grounding Source:

- Select “Vertex AI Search”.
- Vertex AI datastore path: This is crucial! You need the full path. Go back to your Data Stores list (AI Applications -> Data Stores), click on your data store name, and copy the “ID”. It will look something like projects/agentoc/locations/global/collections/default_collection/dataStores/agentoc-data-sources_1746981317464
- Paste this into the path field. Change the values in bold.
- Click “Save”.
5. Test Your Prompt: Now, ask questions related to your documents!
- “What is MCP Inspector?”

Question about MCP grounded with the protocol documentation
- “What is AgentCard?”

Question about A2A grounded with the protocol documentation
- You should see the AI generate an answer, and importantly, cite the “Grounding Sources” it used from your data store! This is RAG in action.
6. Save Your Prompt (Optional but Recommended):

Save the prompt before deploying it on Cloud Run
- Click “Save” in Vertex AI Studio.
- Give it a name like “Agentoc: A2A and MCP Assistant”.
Step 4: Deploy as a Web App (The 1-Click Wonder!)
Ready to share this? Vertex AI Studio makes it incredibly easy with the help of Cloud Run.
1. Create Web App:
- In Vertex AI Studio, with your working prompt, look for a “Build with code”. Select the option to “Deploy as app”.
2. Enable APIs (if needed): The deployment will likely use Cloud Run, Artifact Registry, and Cloud Build. Enable these if prompted.

Activate of the required API for Cloud Run deployment
3. Acknowledge Public Access: It is important to understand the implications of this step!!! With the current version of Vertex AI Studio, you must first deploy an unauthenticated public endpoint before converting it to a private and/or authenticated deployment. If this is not feasible for your use case, you can instead jump to Step 5.
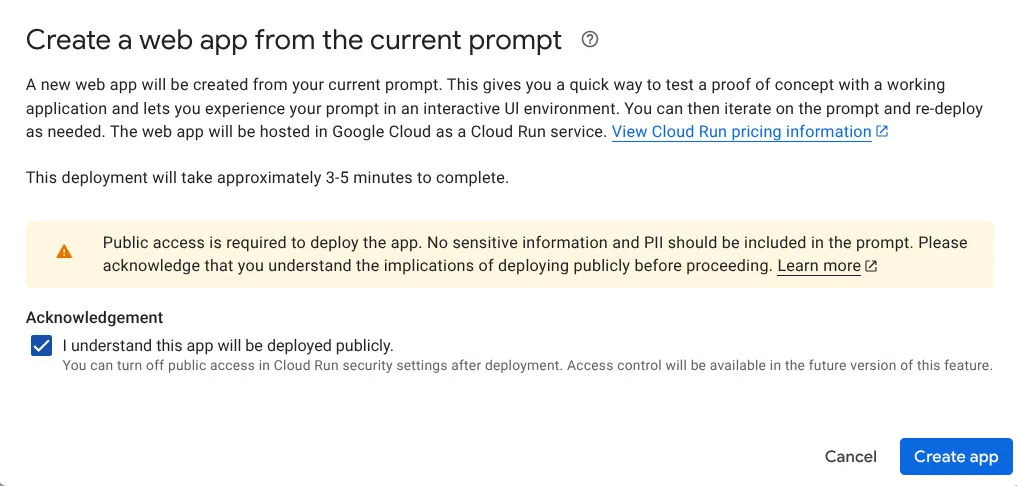
Be mindful about deploying to Cloud Run as a public/unauthenticated endpoint first!
4. Test Your Live App: You’ll get a URL for your deployed Cloud Run service. Open it up and interact with your AI assistant!
- Important note: you must open the app from Vertex AI Studio and not Cloud Run. This is important to get the secret key required to get access to your application.
- Security note: while the key is “secret”, it can easily be retrieved from the URL via man-in-the-middle attack. This is not a sufficient method.

Pending deployment of the assistant on Cloud RUn
- What is MCP Inspector?

MCP question made to the web application deployed
- What is AgentCard?

A2A question made to the web application deployed
(Bonus) Step 5: Get the Code
Vertex AI Studio also gives you the Python (and other languages) code to call your grounded model programmatically. Click “Build with code” in the prompt interface, and then “Get Code”.

Get the code from Vertex AI Studio
You can then put the code on your laptop and execute it.

Result of the “get code” script with grounded knowledge
This is super handy for integrating into other applications!
And That’s It!
In just a few steps, we went from raw documents to a fully deployed, interactive RAG application. The key is the tight integration between Cloud Storage, Vertex AI Search, and Vertex AI Studio.
Why this is a Hackathon Winner:
- Speed: Minimal coding, maximum automation.
- Power: Leverages Google’s robust LLMs and search infrastructure.
- Focus: Lets you focus on the data and the user experience, not plumbing.
Now, go build something amazing for the Hackathon!
- Github Repository: https://github.com/fmind/agentoc
Dive in
Related
Video
Let's Build a Website in 10 minutes with GitHub Copilot
By Bryant Son • Mar 6th, 2024 • Views 639
Video
RagSys: RAG is Just RecSys in Disguise // Chang She // AI in Production Lightning Talk
By Chang She • Feb 22nd, 2024 • Views 741
Blog
mAIdAI: Building a Personal Assistant with Google Cloud and Vertex AI
By Médéric Hurier • Mar 10th, 2026 • Views 112
Blog
How to Build Your First Semantic Search System: My Step-by-Step Guide with Code
By Sonam Gupta • Jan 5th, 2024 • Views 1.1K
Video
Let's Build a Website in 10 minutes with GitHub Copilot
By Bryant Son • Mar 6th, 2024 • Views 639
Blog
mAIdAI: Building a Personal Assistant with Google Cloud and Vertex AI
By Médéric Hurier • Mar 10th, 2026 • Views 112
Blog
How to Build Your First Semantic Search System: My Step-by-Step Guide with Code
By Sonam Gupta • Jan 5th, 2024 • Views 1.1K
Video
RagSys: RAG is Just RecSys in Disguise // Chang She // AI in Production Lightning Talk
By Chang She • Feb 22nd, 2024 • Views 741