
Find Your Code! Scaling a LlamaIndex and Qdrant Application with Google Kubernetes Engine

# LLMs
# Autoscale
# Martin Data Solutions
Autoscaling a RAG application to interact with your GitHub repositories
July 8, 2024
Benito Martin

Author: Benito Martin
Have you ever struggled to locate that perfect piece of code you wrote months ago? In this article, I will guide you on how to create an LLM application using LlamaIndex and Qdrant that will allow you to interact with your GitHub repositories, making it easier than ever to find forgotten code snippets. We’ll deploy the application on Google Kubernetes Engine (GKE) with Docker and FastAPI and provide an intuitive Streamlit UI for sending queries.
Let’s find the code!
Prerequisites
Before we start, ensure you have the following:
- A GCP account with one project, the service account key, and activated GKE API
- One Qdrant cluster and the corresponding API Key and URL
- An OpenAI API key
- Gcloud CLI installed (configuration guide )
- Kubernetes installed (configuration guide )
- A GitHub Access Token
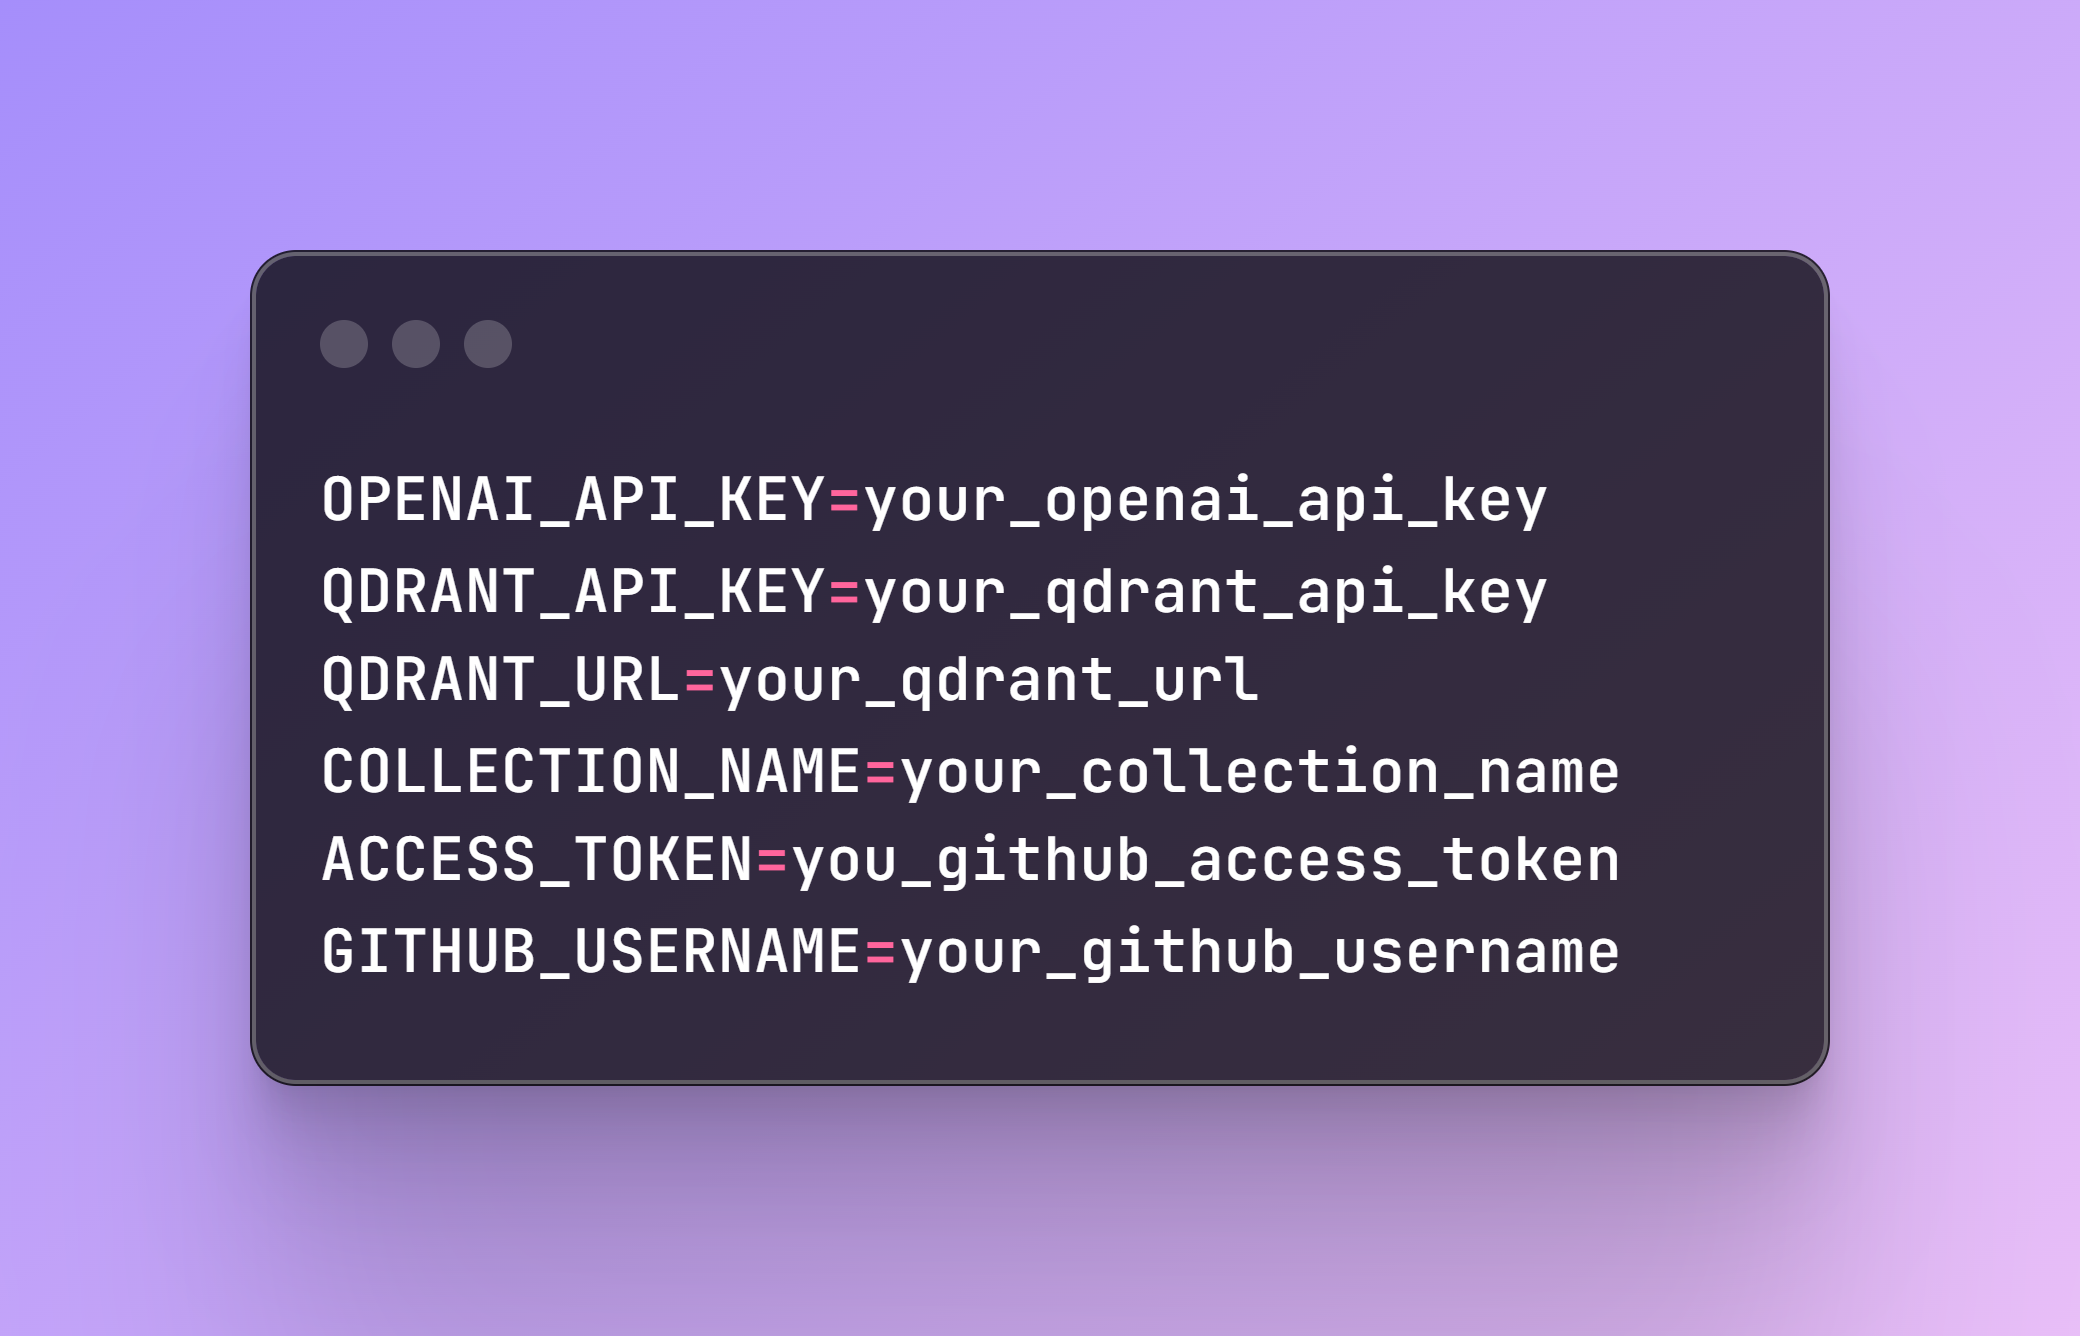
Step 1: Setting Up Environment Variables
Create a .env file in your project directory with the following content:
Step 2: Creating the Qdrant Collection
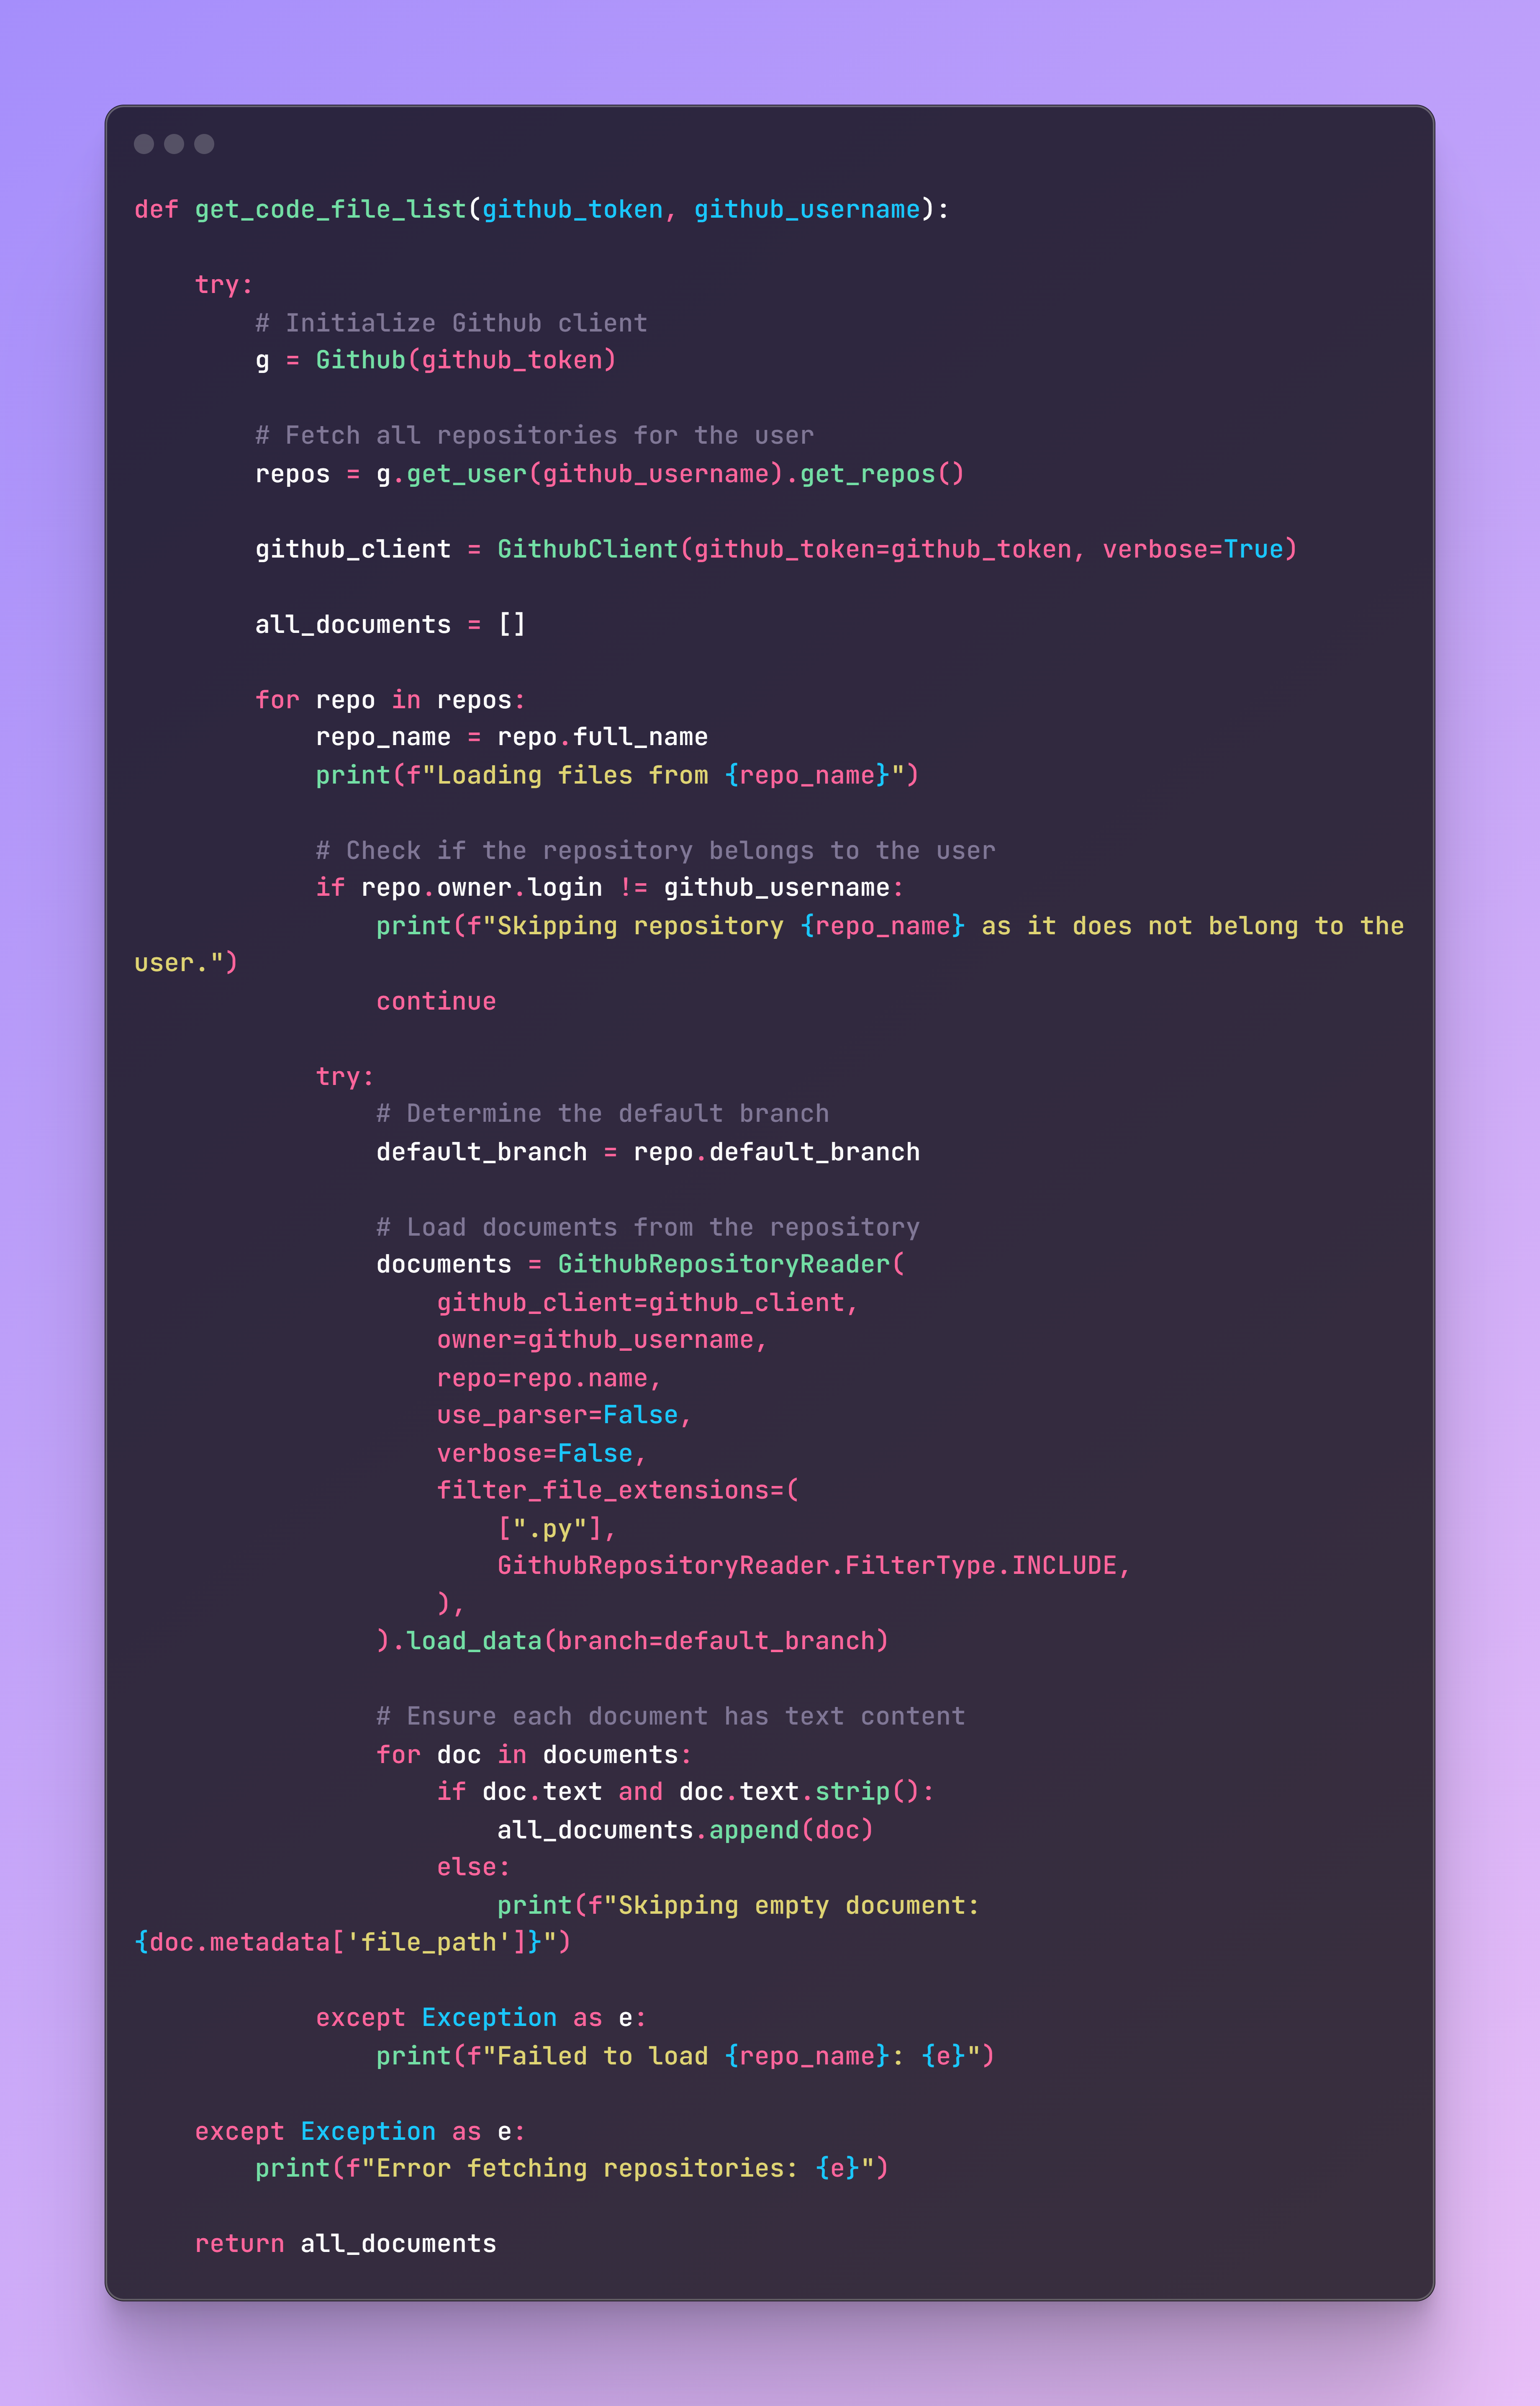
File name: create_qdrant_collection.py
Qdrant is an open-source vector database that excels in semantic similarity search tasks. Storing our data on Qdrant will allow us to find our code based on semantic search queries.The first task will be to fetch all repositories and the corresponding files. The code is structured to retrieve only Python files with code inside, avoiding empty content fields that could affect the semantic search capabilities.
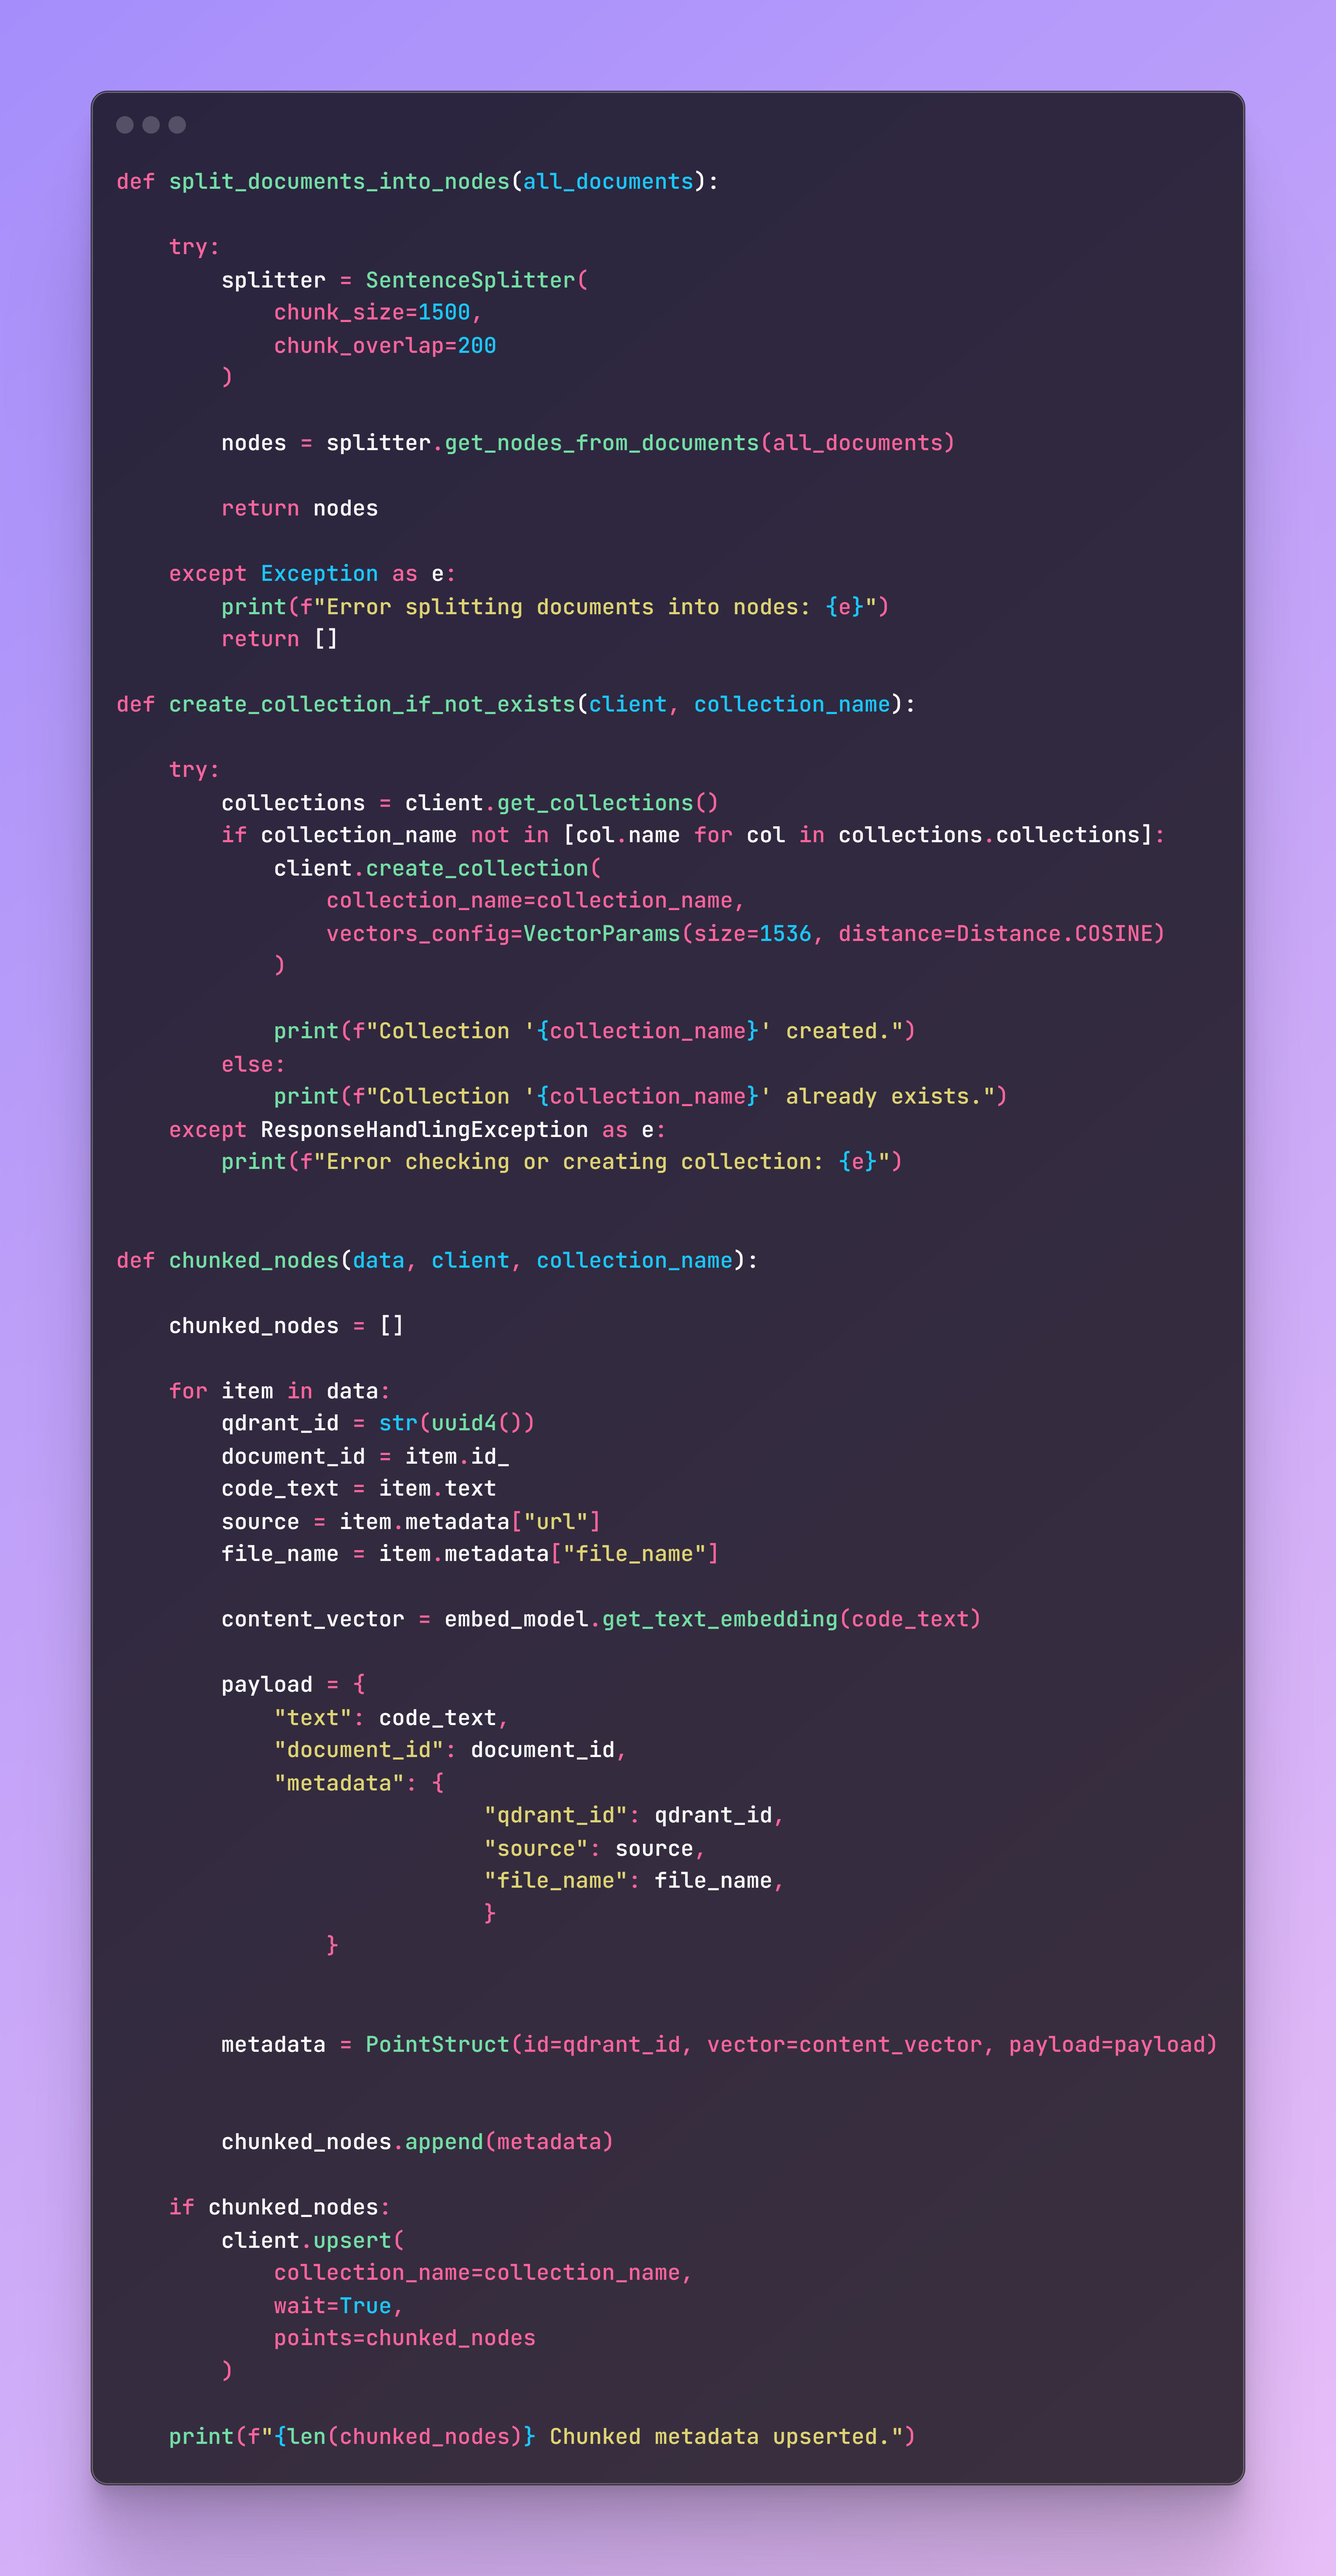
Once we have all our files stored in a list, it is time to split them into nodes with LlamaIndex and save the content and metadata in a Qdrant collection. This is where our documents will be stored, and our API will search for the code you are looking for. The chunked nodes function is standard for a Qdrant collection and can be adapted and reused depending on the metadata structure of the documents. Another example can be found on a previous article I wrote for a similar application deployed on AWS.
Once you run the code, the collection will be on your Qdrant Cluster.
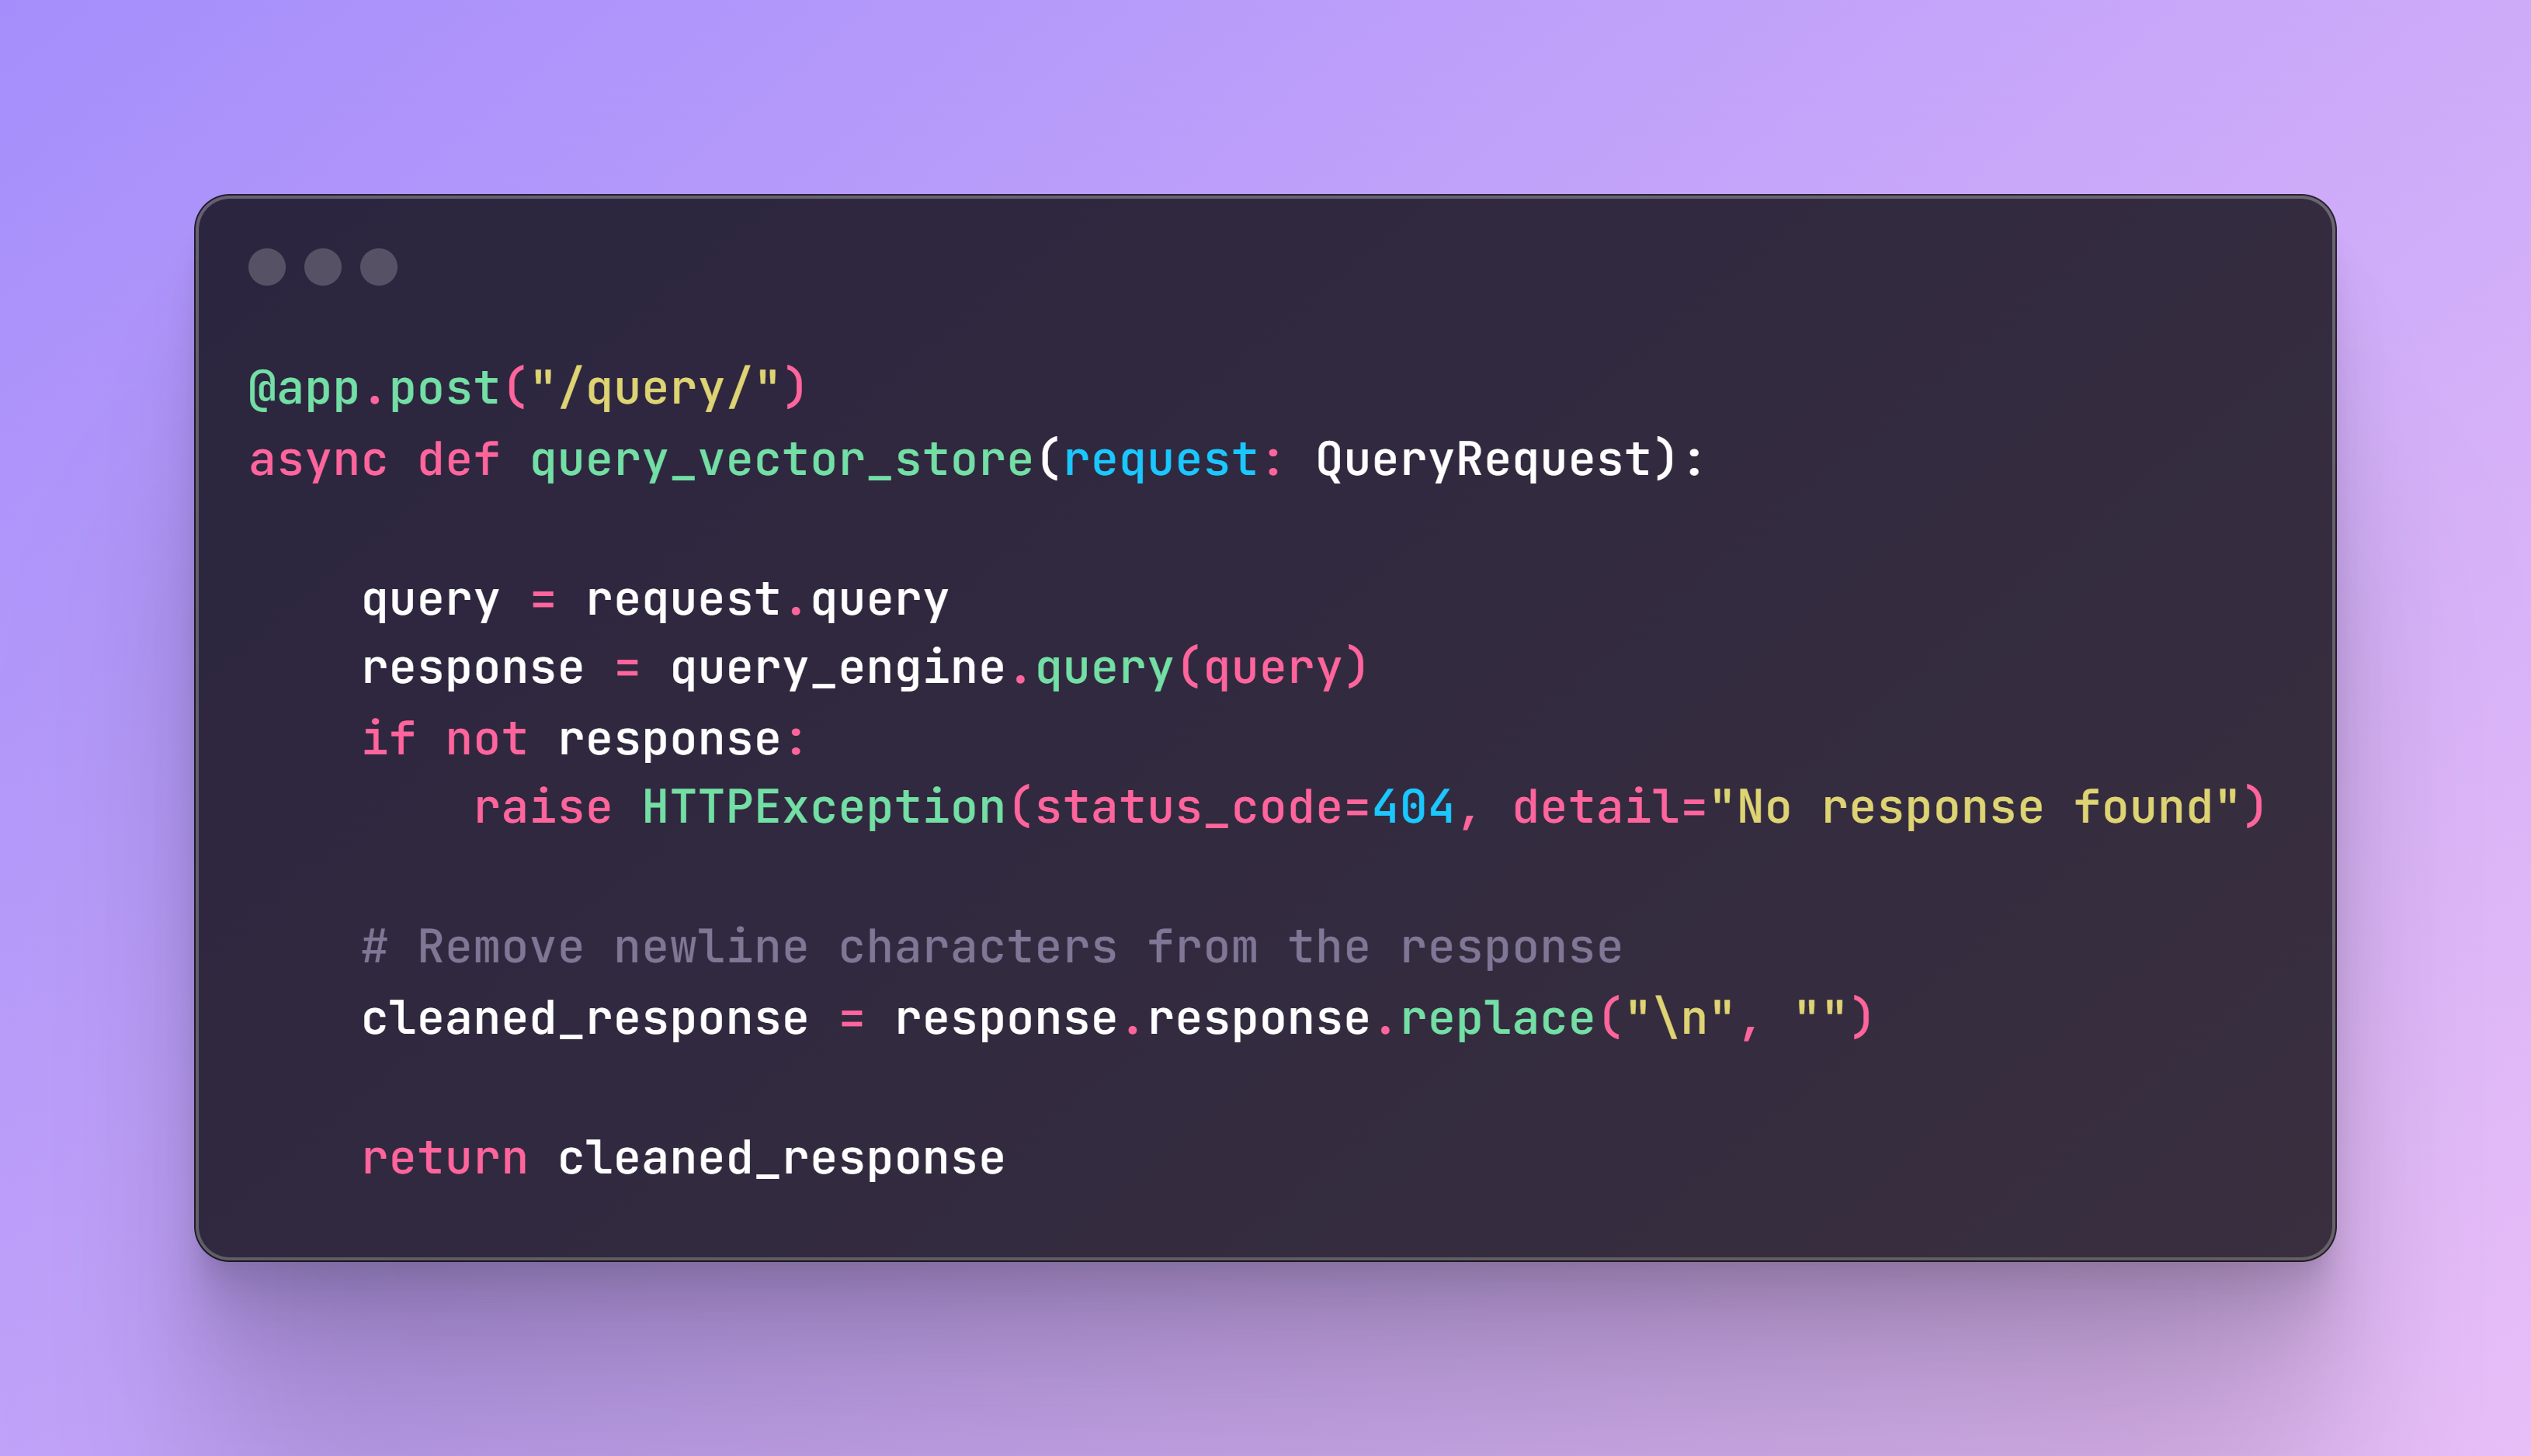
Step 3: Defining the FastAPI Application
File name: app.py
Now it is time to define our application that will receive a query, search the Qdrant collection for the best matches, and return the relevant code. The main components of the RAG application are:
- Qdrant collection as retriever.
- Prompt with instructions.
- SentenceTransformerRerank for faster and more concise retrieval.
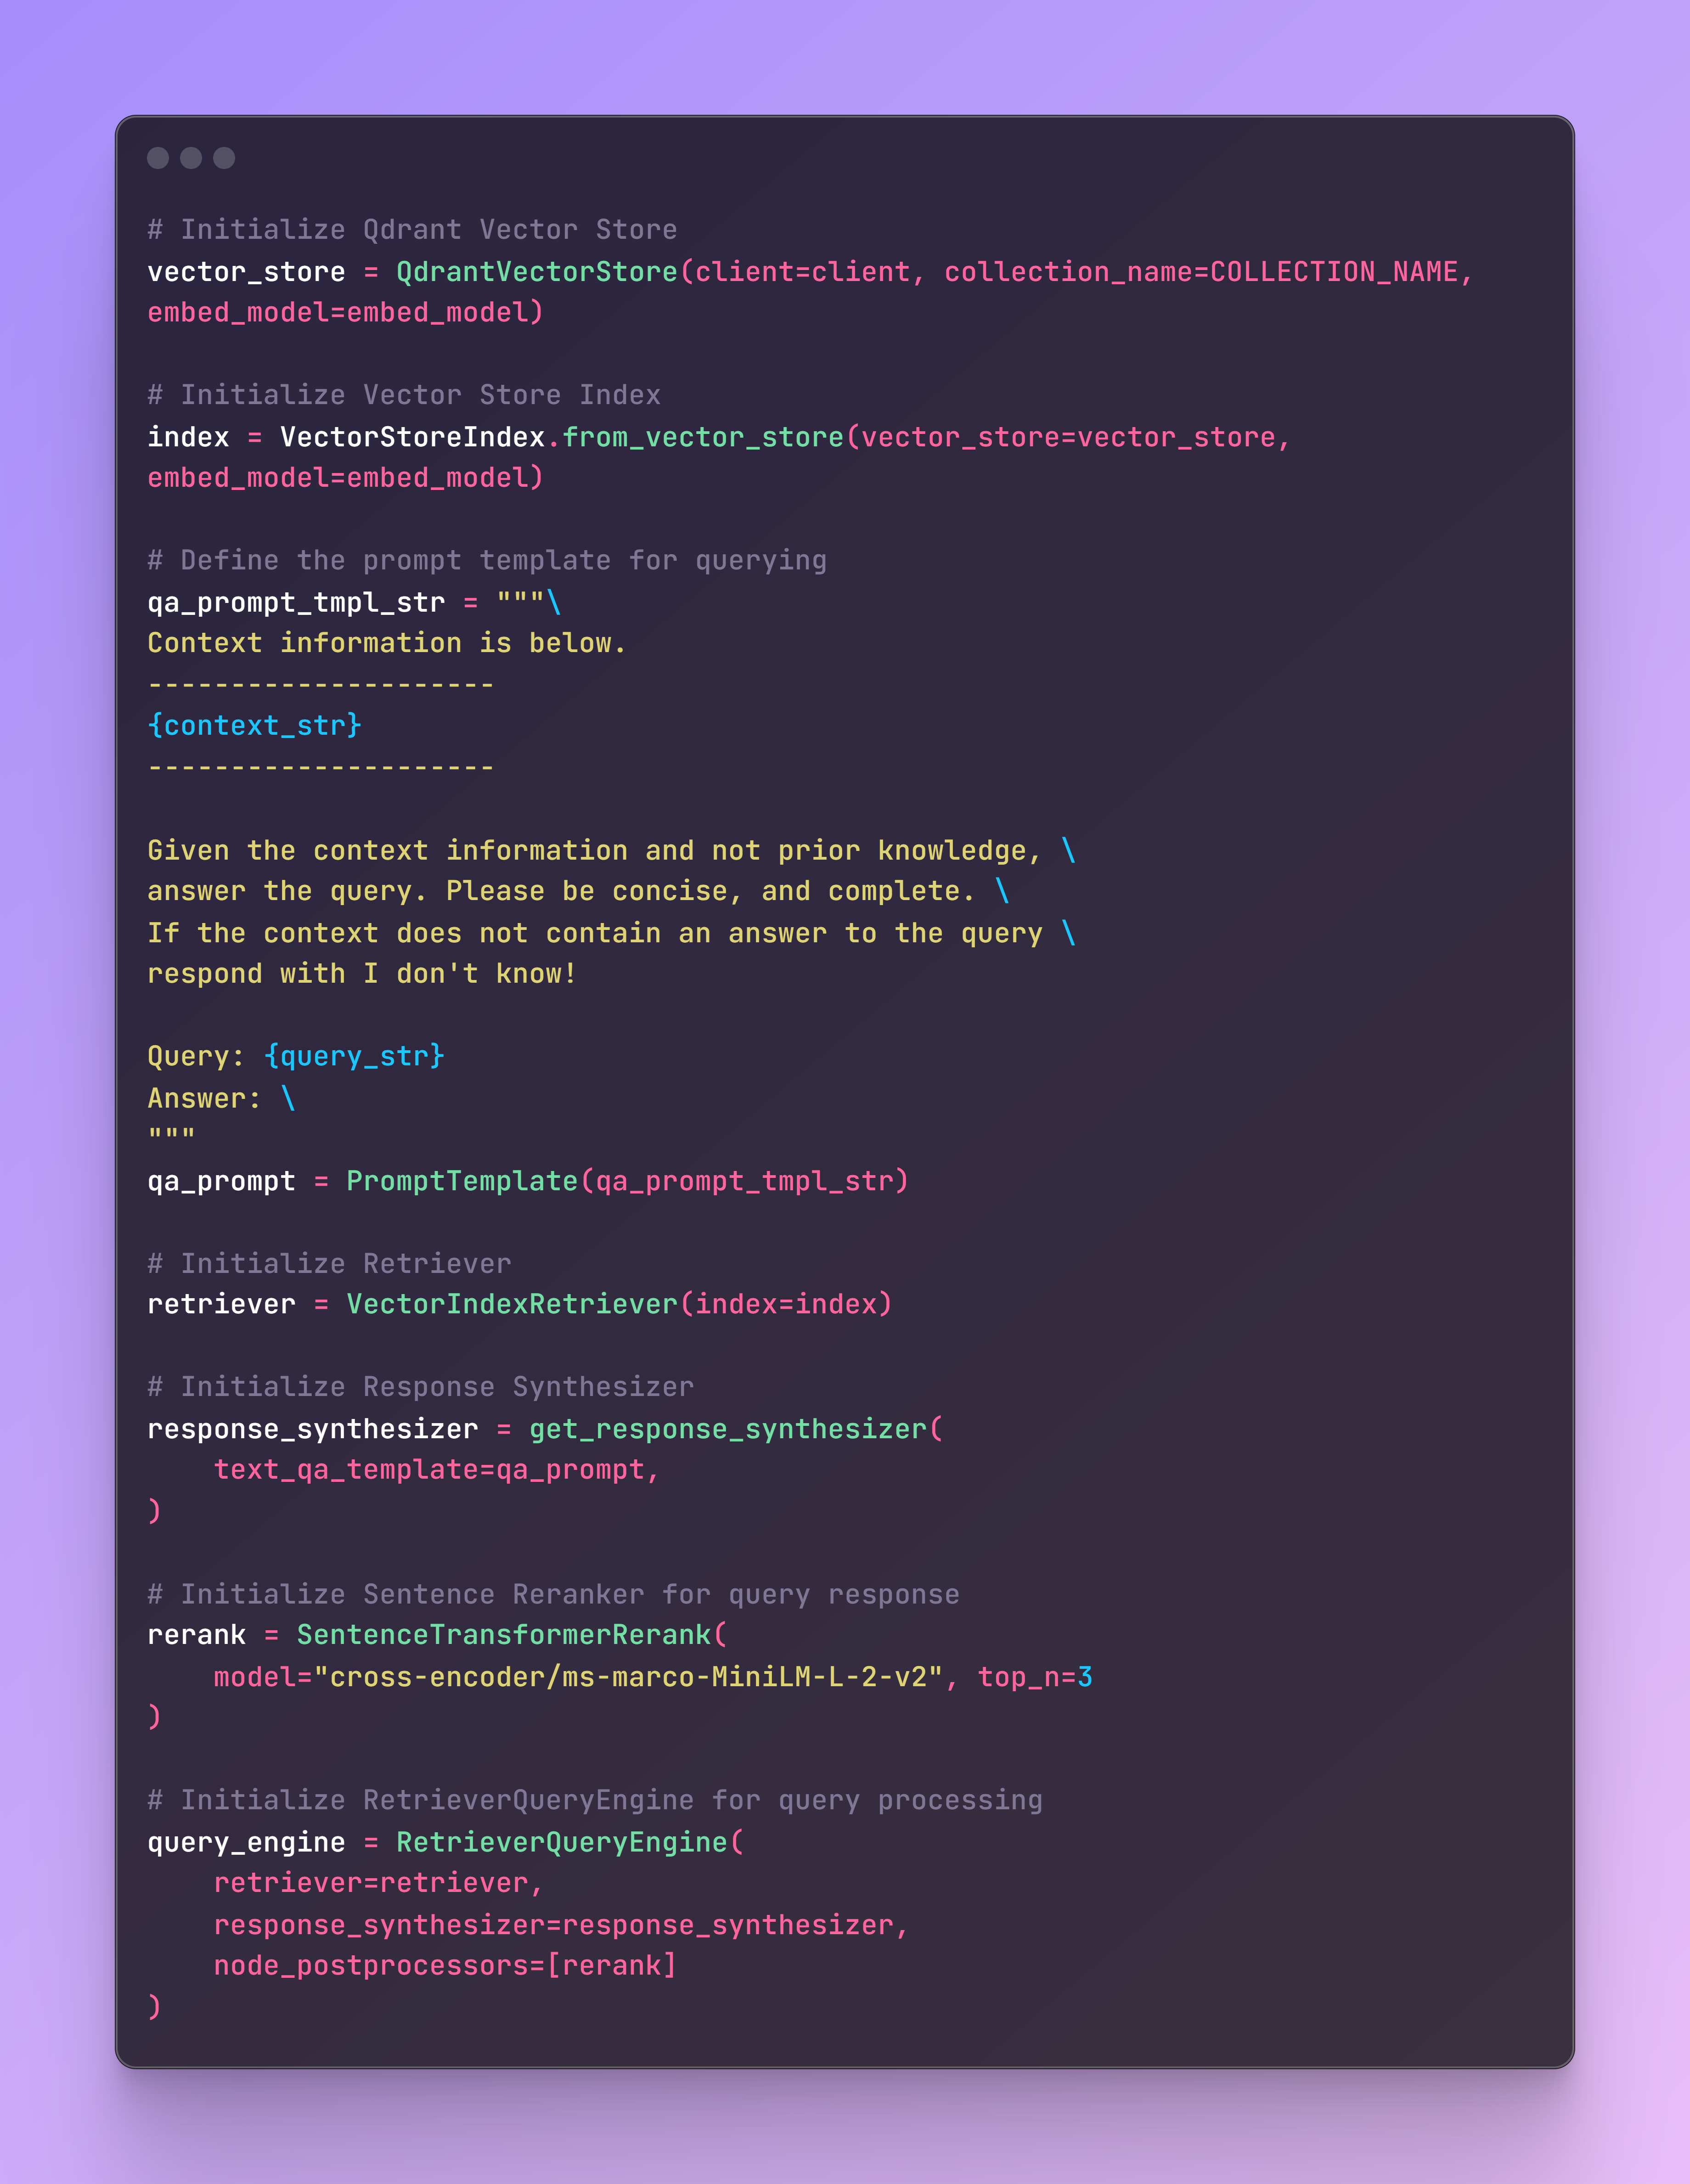
This easy implementation guarantees a more accurate retrieval of our context and a better result. Additionally, the application will be deployed on a CPU instance, where speeding up the retrieval process plays a crucial role.
Step 4: Understanding Kubernetes
Now it is time to configure our Kubernetes deployment, where we need to consider several factors like resources/memory allocation and scalability. Let’s first describe how Kubernetes works.
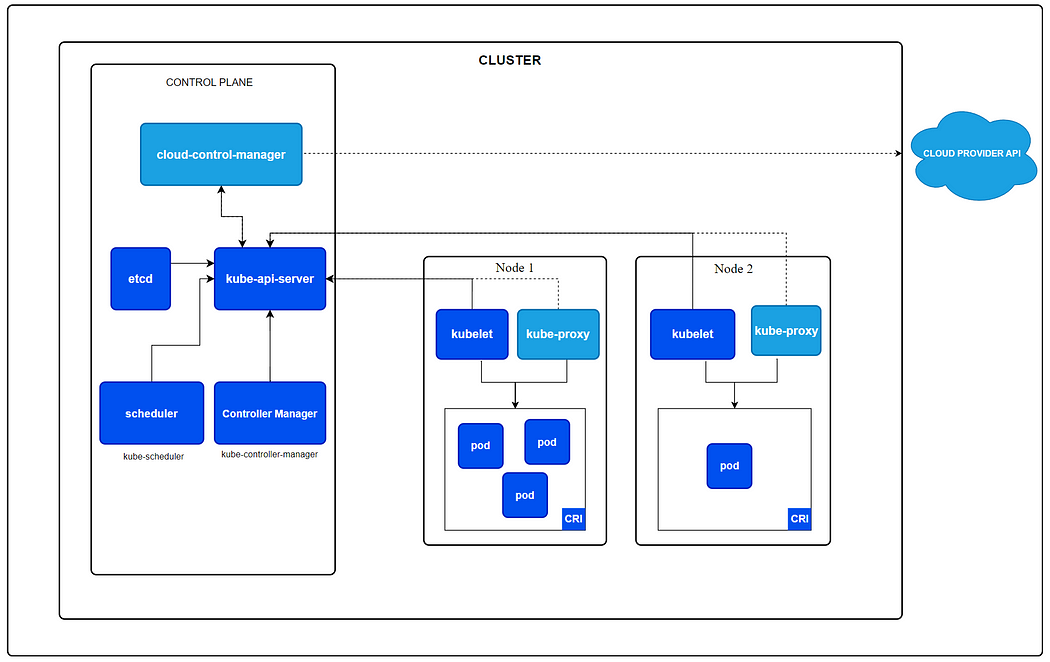
Kubernetes is a powerful, open-source platform designed to automate the deployment, scaling, and management of containerized applications. Its architecture is built around the following key components:
- API Server: It is the central management entity.
- Controller Manager: Manages controllers that handle routine tasks such as replication and scaling and makes sure the deployment is running as per specifications.
- Worker Nodes: These are instances (either virtual machines or physical servers) that run the applications in the form of containers.
- Scheduler: Assigns workloads to nodes based on resource availability and other constraints.
- Pods: The smallest deployable units in Kubernetes, representing a single instance of a running process in a cluster. Pods can contain one or more containers that share storage, network, and a specification for how to run the containers.
The nodes have three main components:
- Kubelet: An agent that ensures containers are running in a Pod.
- Kube-proxy: Handles network traffic within the Kubernetes cluster.
- Container Runtime: Software that runs the containers (Docker for our app).
This architecture provides robust scalability, ensuring that our app runs as per our specifications at all times. Some of the key factors that make Kubernetes a very popular choice include:
- Self-healing: If a container does not work as expected, such as when a pod stops working, a new pod is automatically generated.
- Rolling Updates: Automated rollouts and rollbacks allow for updating applications without downtime.
- Load Balancing: Distributes load across the pods, optimizing resource utilization.
Let’s now dig deep into the configuration of our Kubernetes Cluster!
Step 5: GKE Configuration File
File name: deploy_gke.yaml
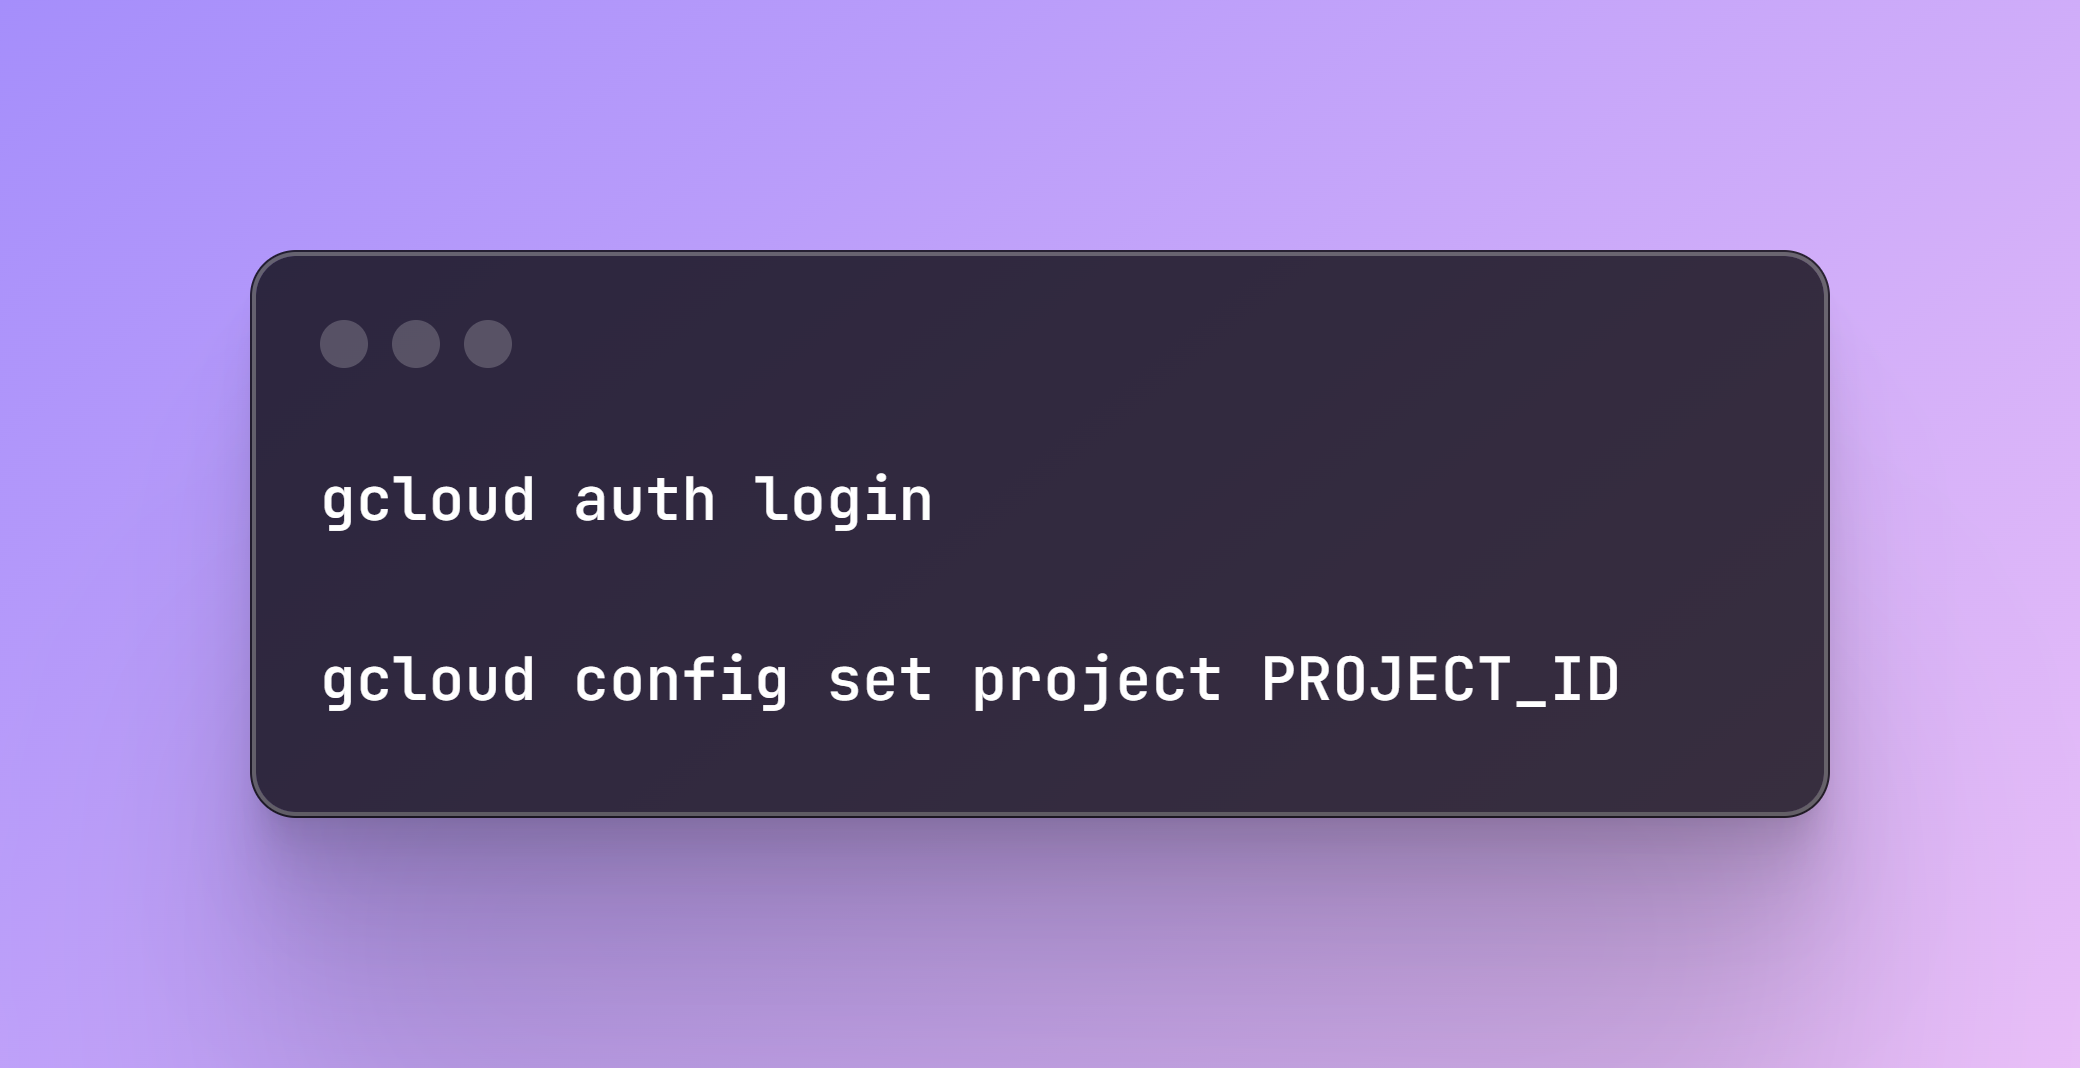
The first step here is to create our Kubernetes Cluster in GKE. Be sure to authenticate in GCP and select the corresponding Project ID:
Once authenticated, you can create the container cluster where several parameters can be configured like the number of nodes and autoscaling capabilities, which by default are not enabled.
As this is not a very heavy computational LLM application, but I wanted to test the scalability I set up the configuration based on an n1-standard-4 (4 CPUs, 15 GB memory) instance instead of the smallest n1-standard-1 (1 CPUs, 3.75 GB memory)
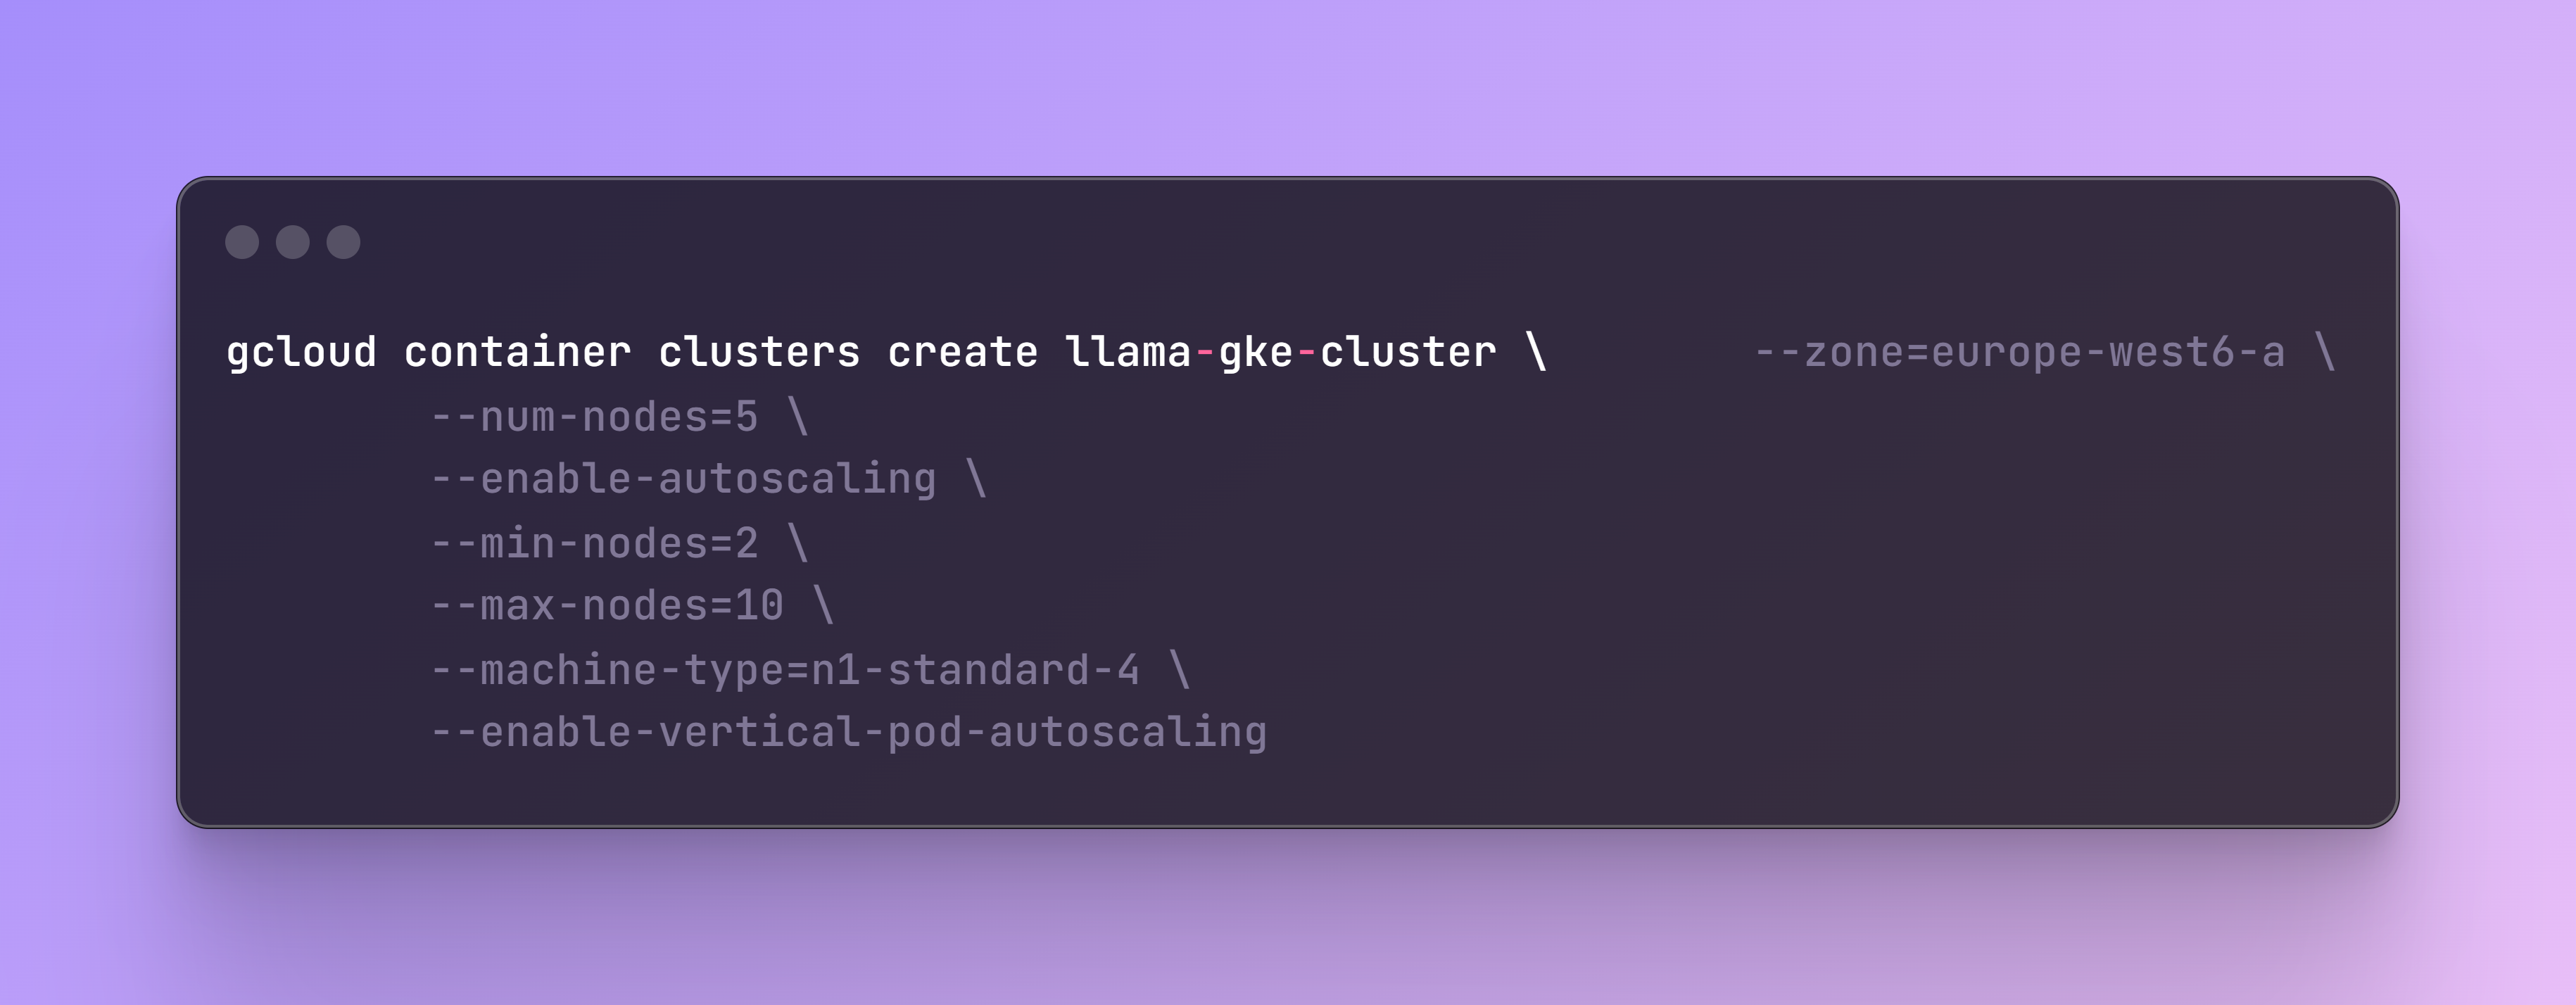
The flag enable-autoscaling automatically adjusts the size of the cluster based on the resource demands. It can add or remove nodes within the specified minimum (--min-nodes) and maximum (--max-nodes) limits. This is an example of cluster autoscaling, as it scales the number of nodes by adding or removing them to meet the demand.
The flag enable-vertical-pod-autoscaling automatically adjusts the CPU and memory resource for the pods based on their actual usage. If a pod needs more resources, updates will be applied to the pod’s resource requests and limits. This is an example of vertical autoscaling, as it scales the resources allocated to a pod vertically, by increasing or decreasing the CPU and memory assigned to it.
The main parts of the YAML file related to vertical autoscaling, which can be further customized, are the resources, where a minimum, a maximum (based on instance capacity) and a policy are set up.

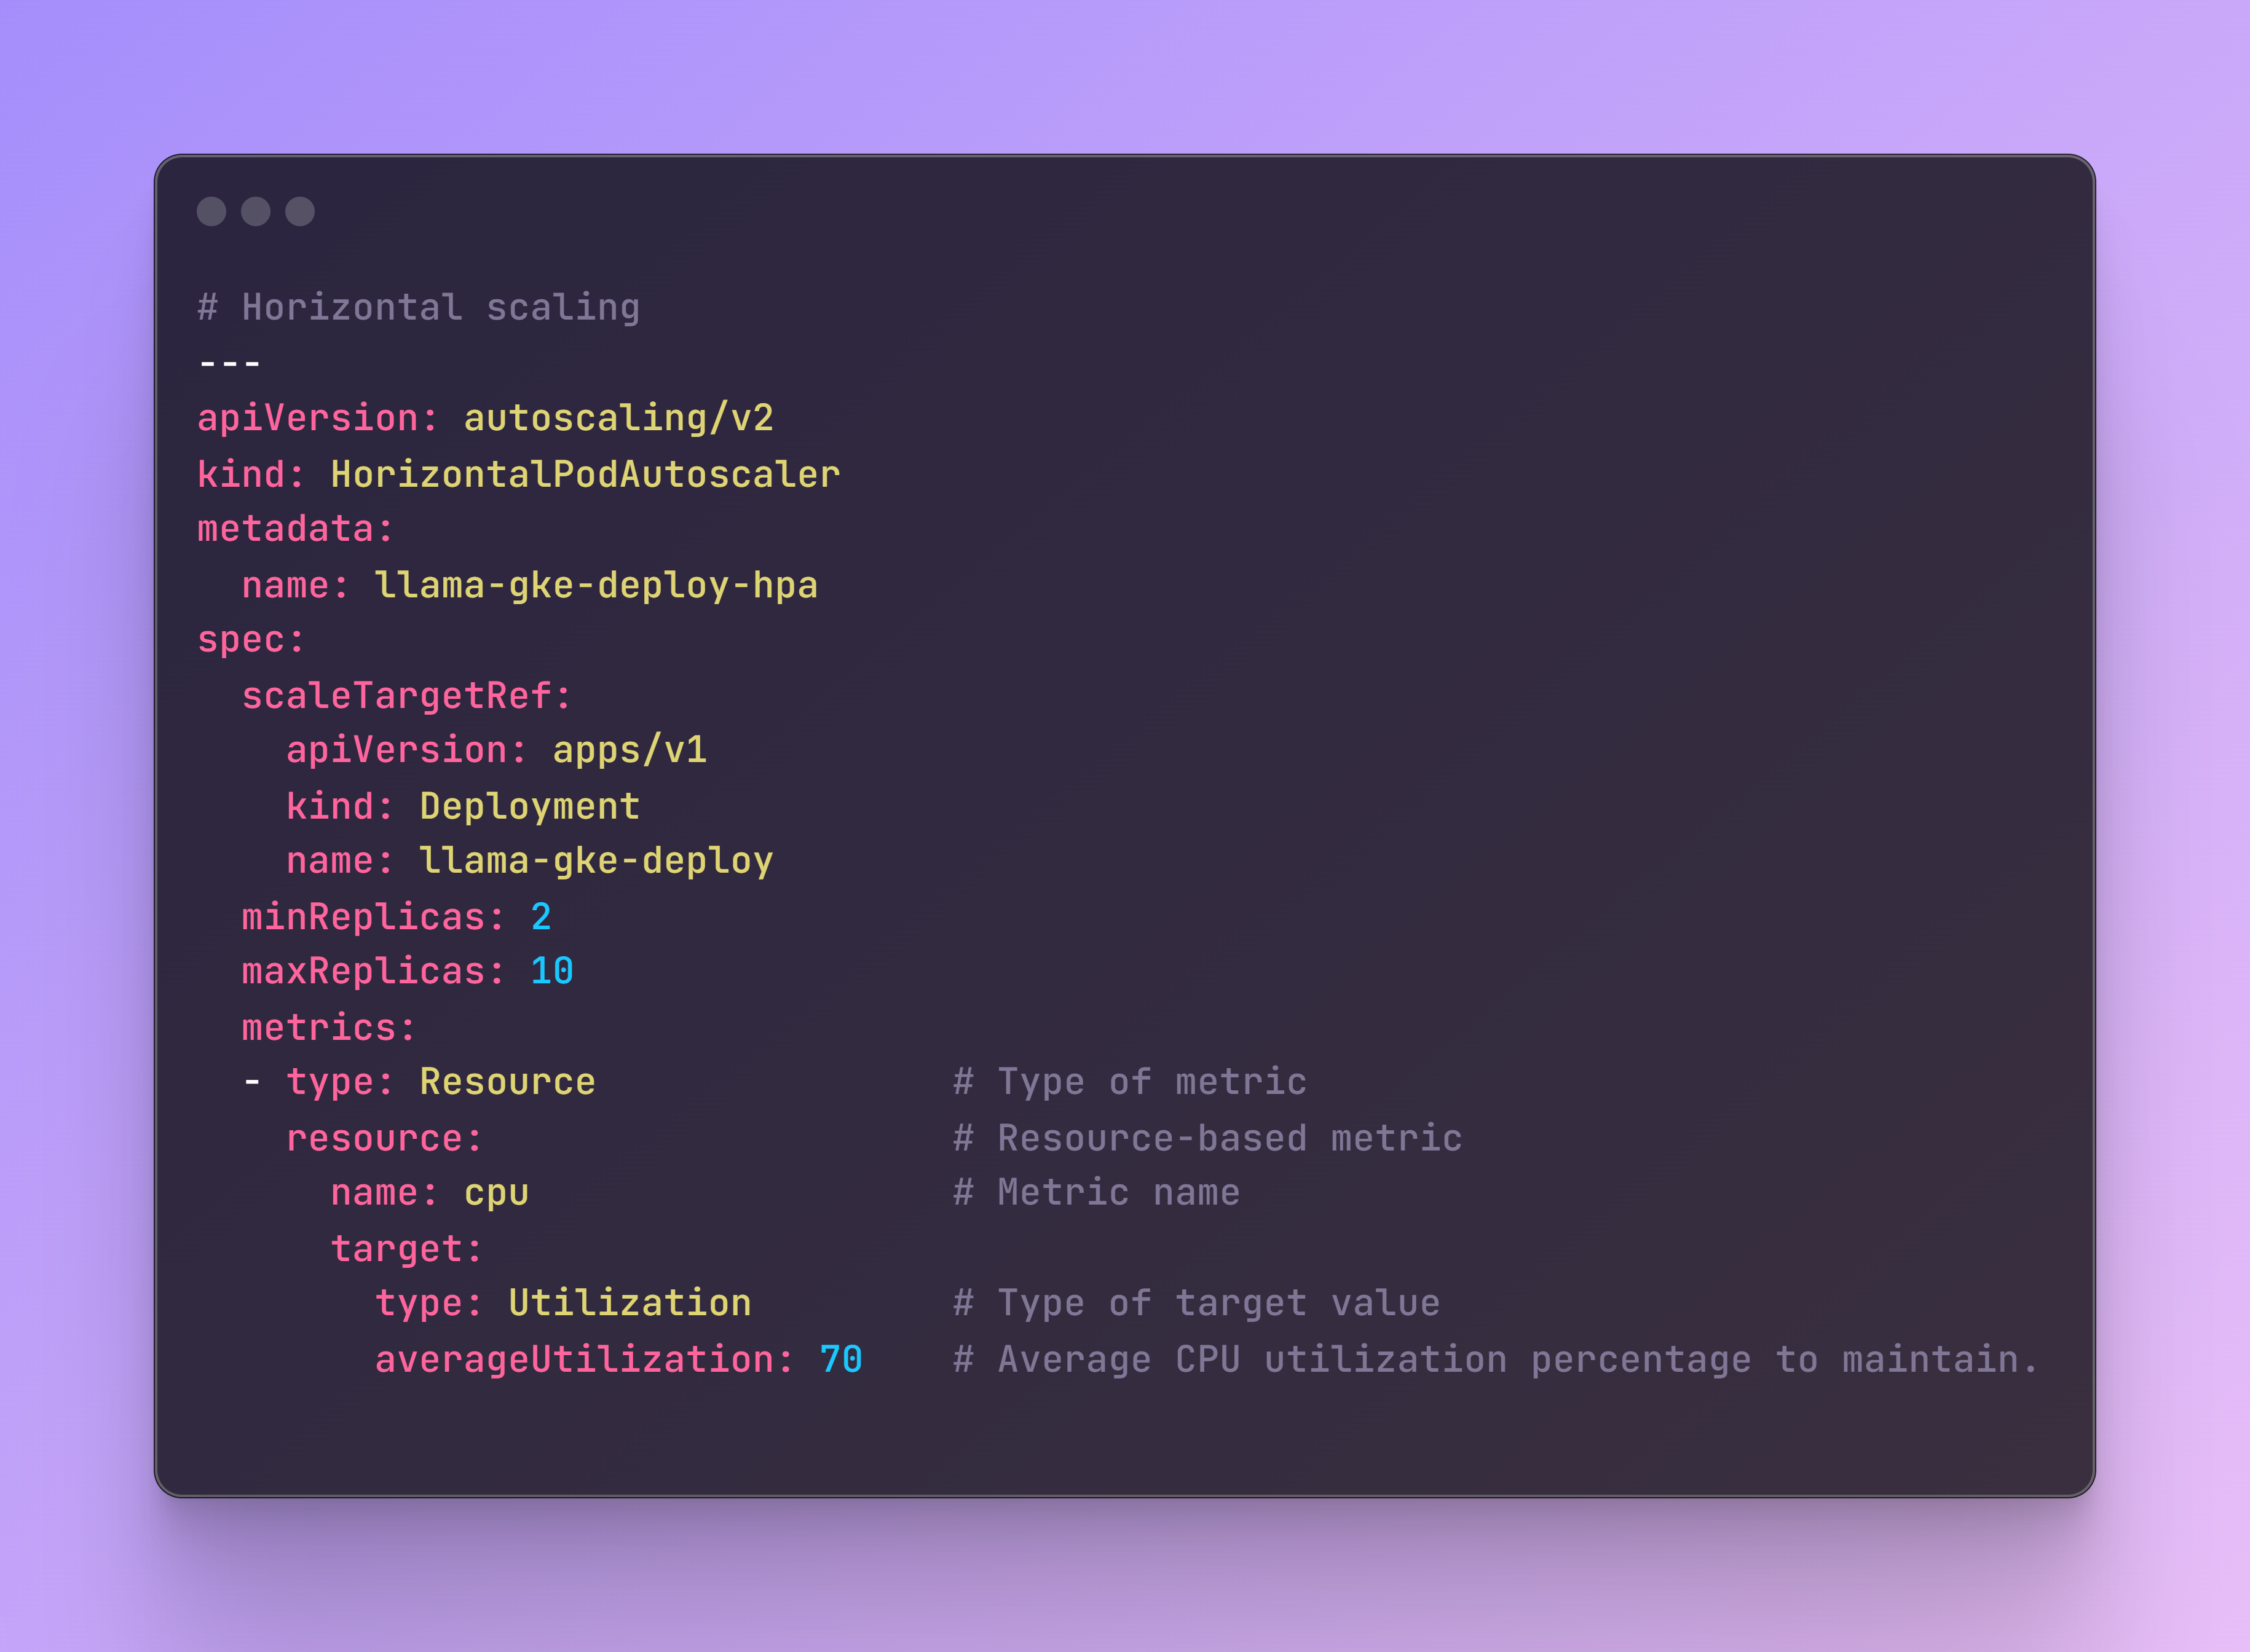
Additionally, to these types of scaling strategies, I included horizontal autoscaling which increase or decrease the number of pods in response to the workload’s CPU or memory consumption. This will apply during deployment of the app.
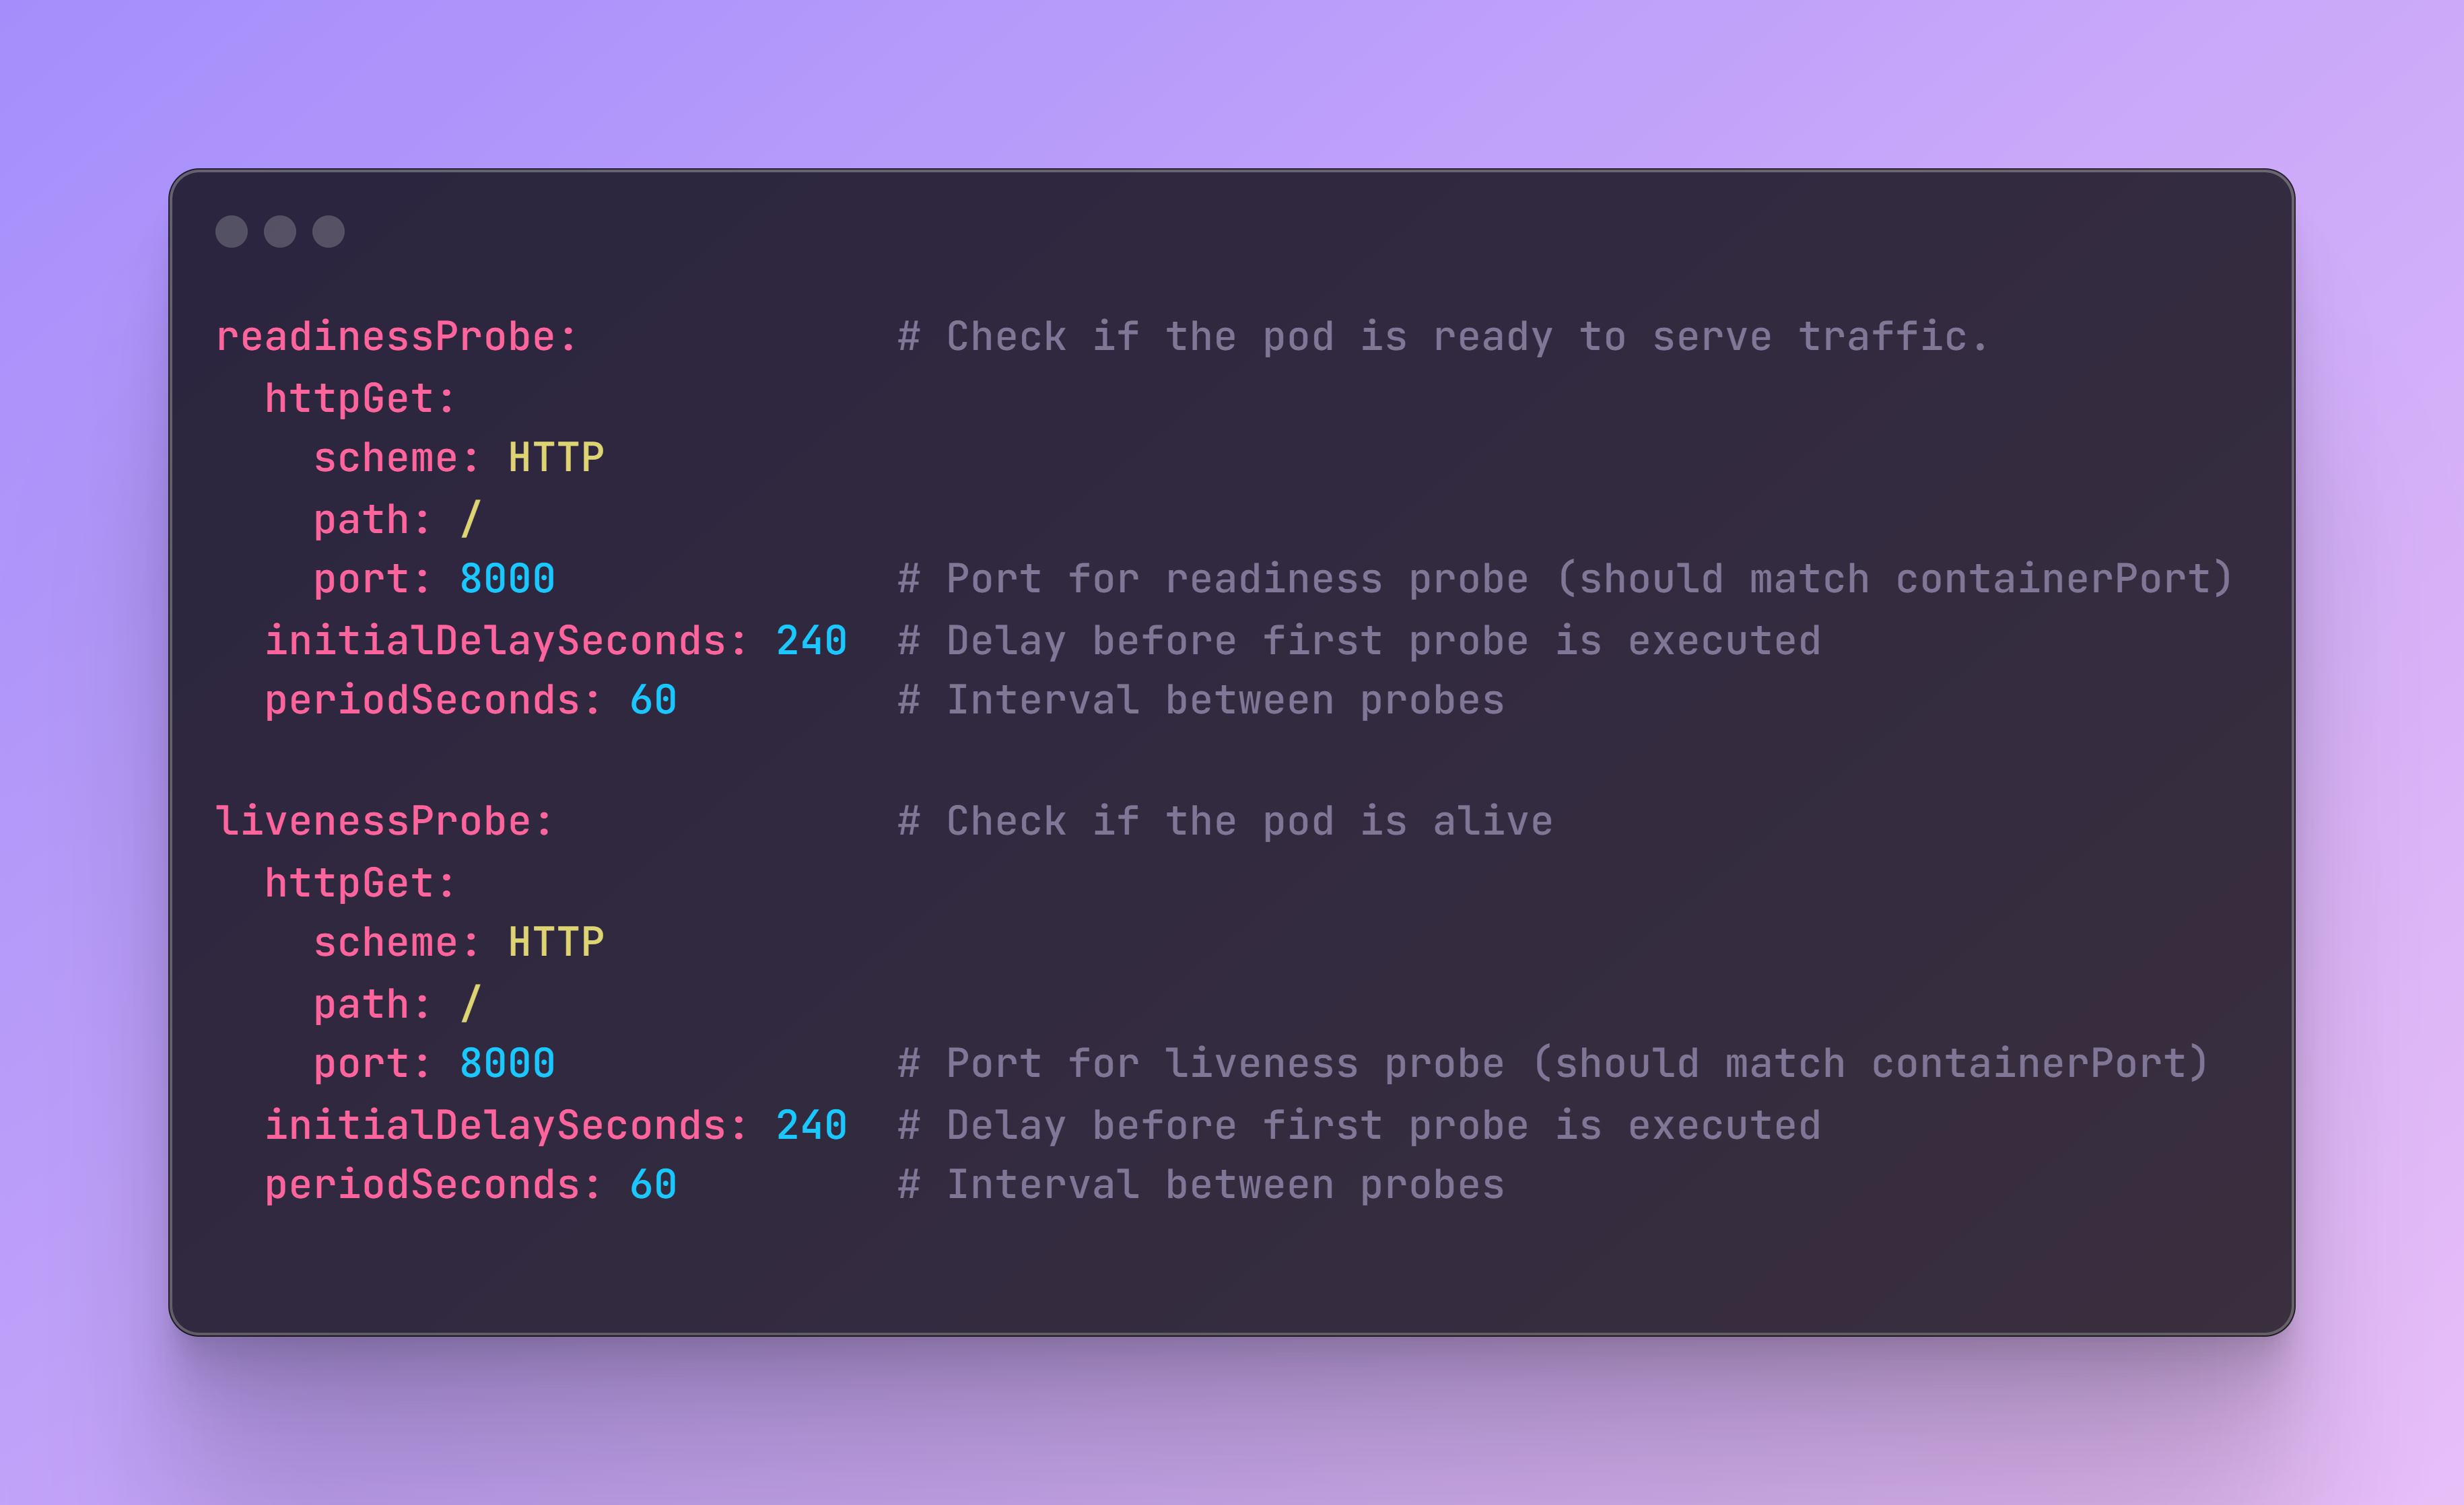
Finally, it is also a good practice to include some health checks in the configuration. The readinessProbe checks if the pod is ready to serve traffic and the livenessProbe checks if the pod is alive. Both test the main port path where the app receives the HTTP requests.
This configuration ensures that the application can scale efficiently and remains robust, handling both vertical and horizontal scaling needs while maintaining health checks.
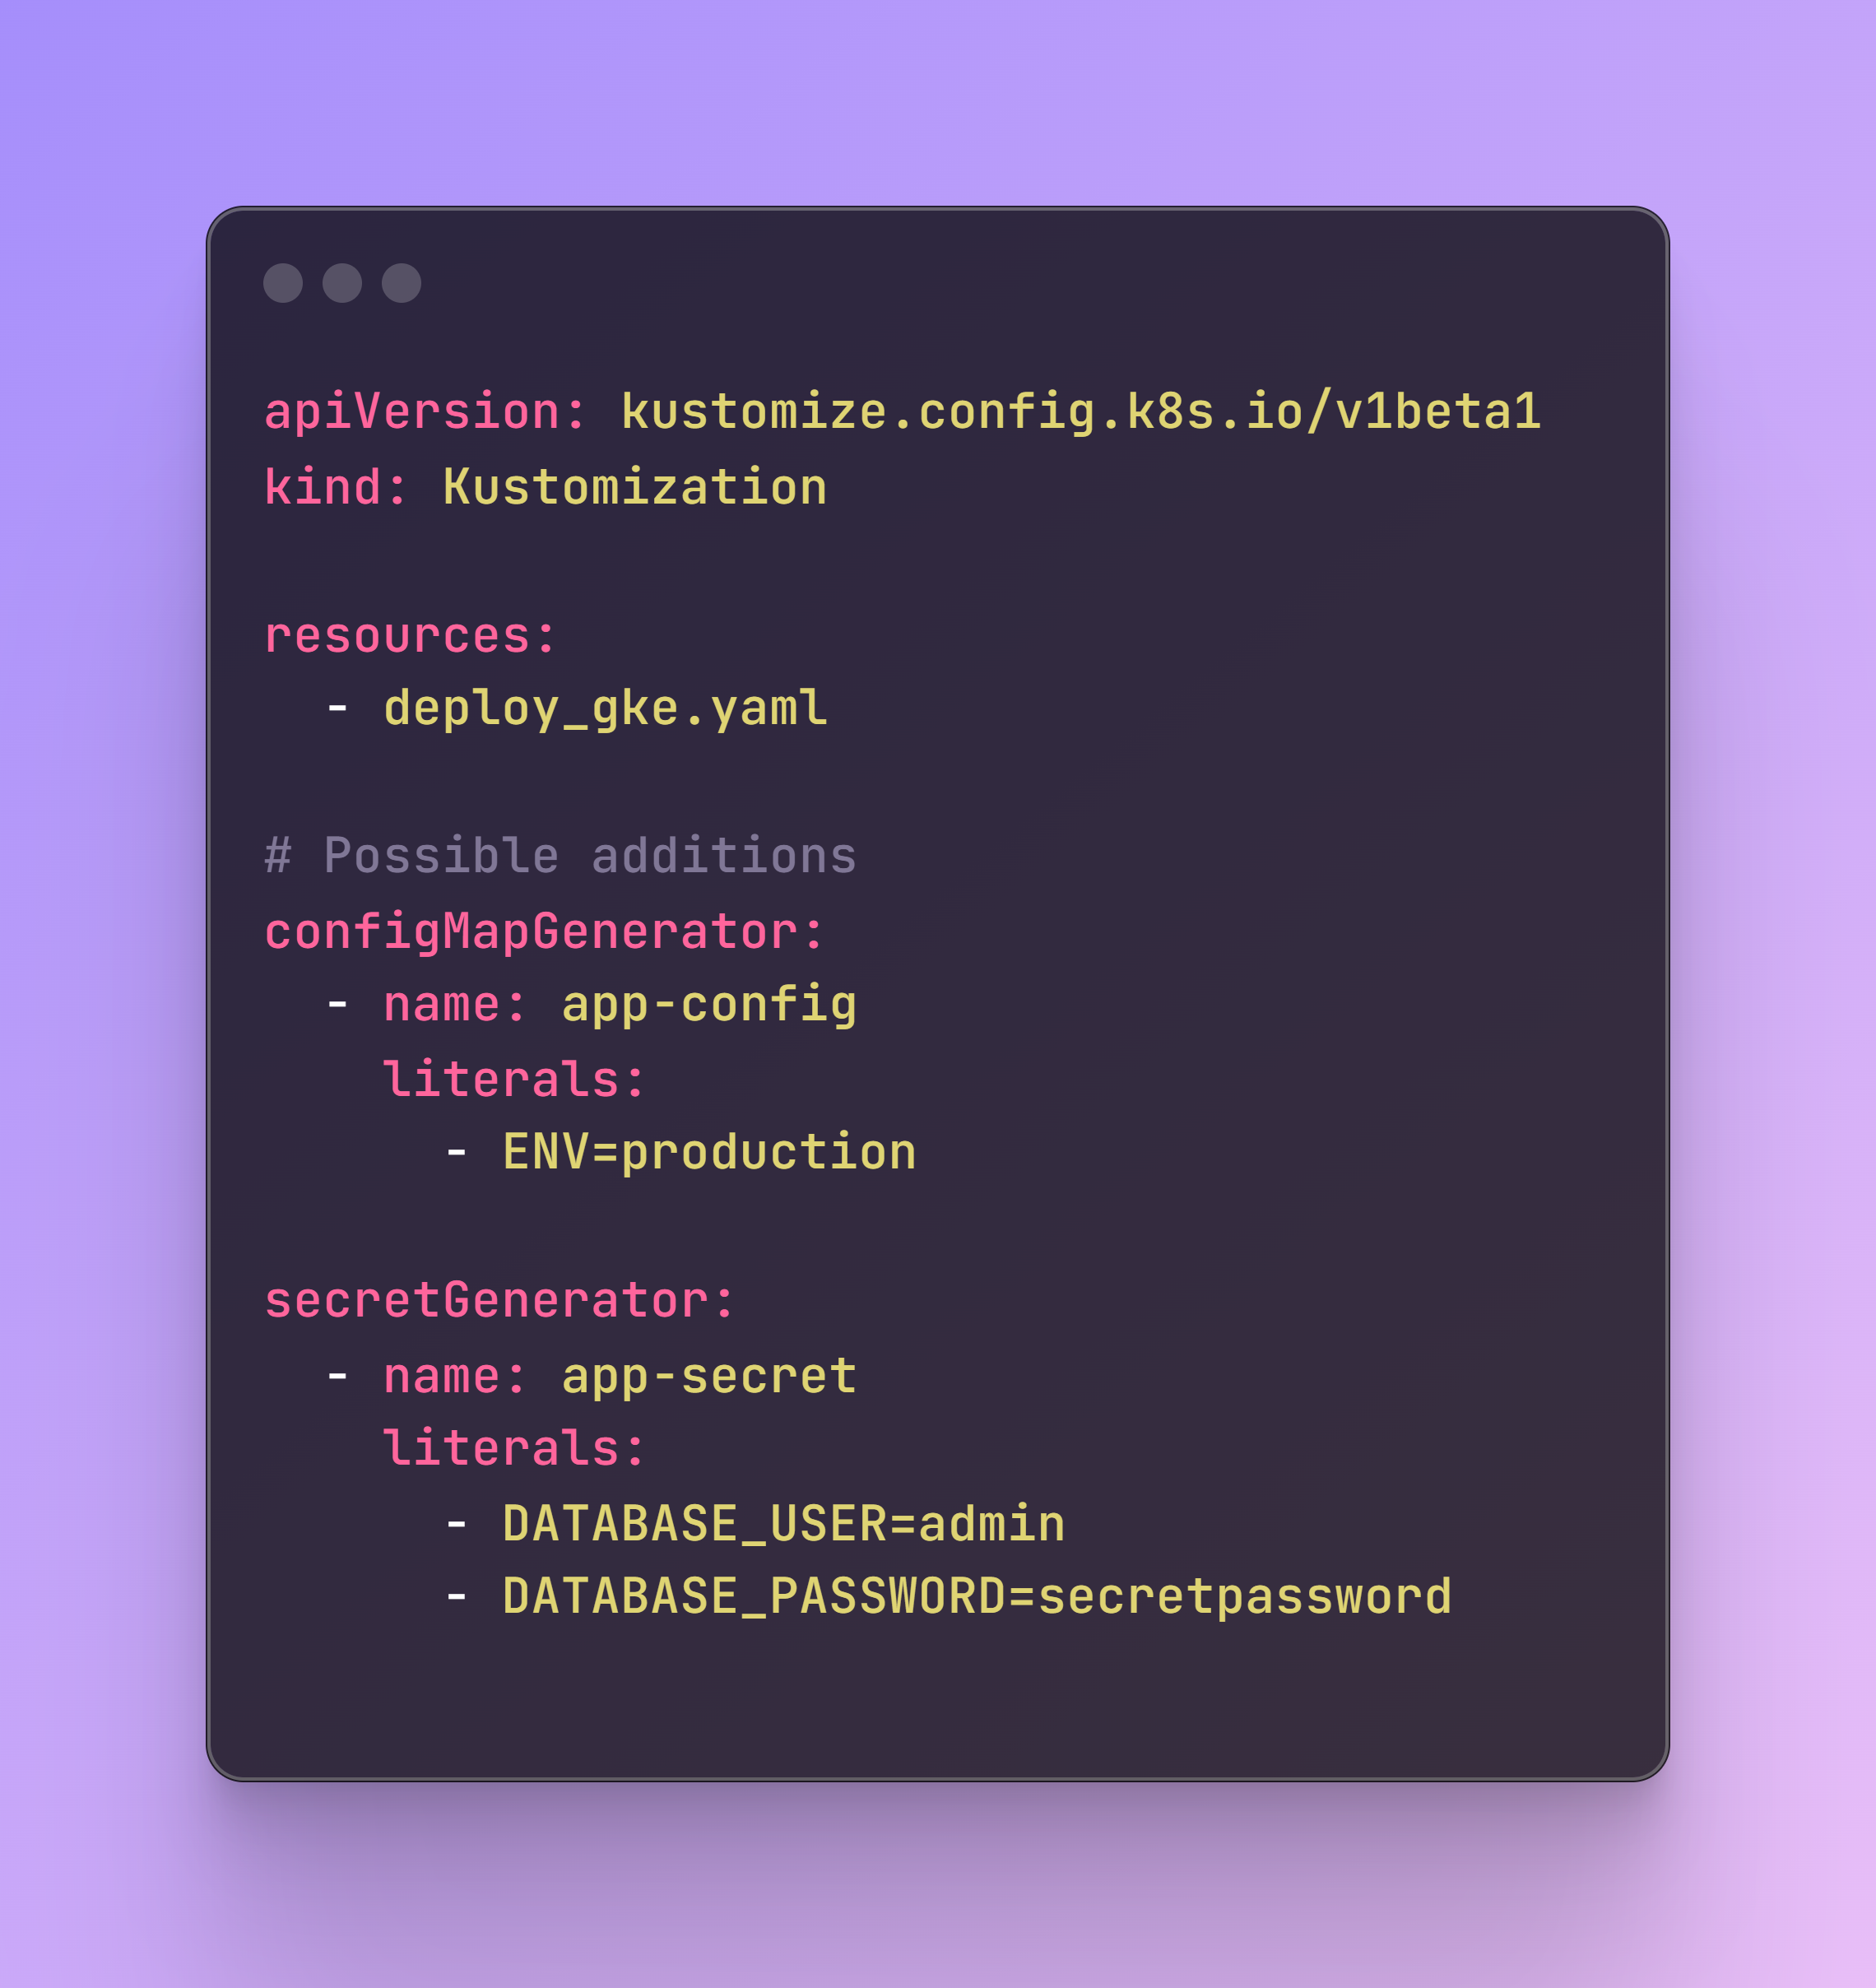
Step 6: Kustomization File
File name: kustomization.yaml
This file helps manage Kubernetes resources, allowing certain customizations while leaving the original files untouched, such as our previous YAML file. Although for this app it is not strictly necessary, as I did not include any custom values (I added them in GitHub actions, see the next step), it can be used to add elements like ConfigMap key-value pairs, which are non-confidential data, or Secrets, which are passwords, API keys, or more sensitive information.
Here is an example of the kustomization.yaml file with possible additions:
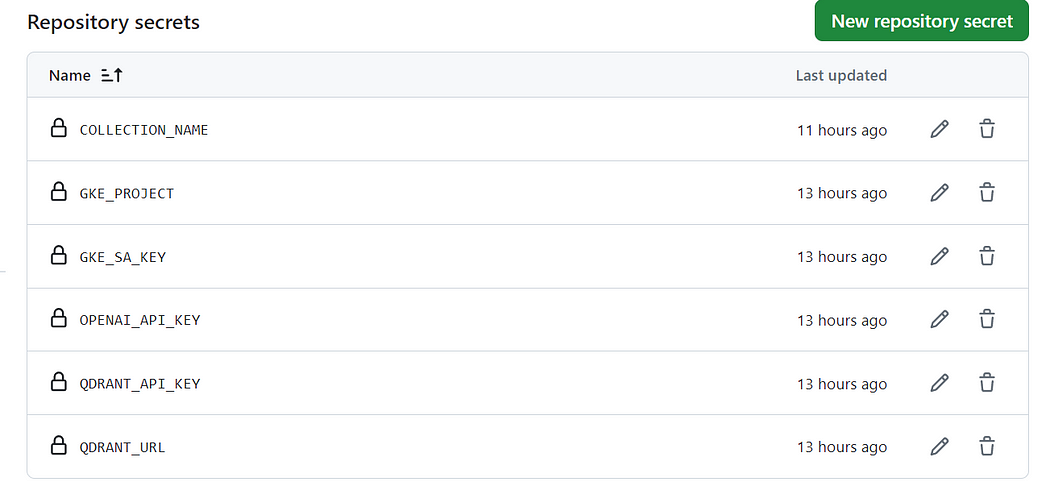
Step 7: GitHub Actions
Before we deploy our app, we need to configure the GitHub actions adding some environmental variables. Below are the required fields. The GKE_PROJECT is the PROJECT_ID in Google Cloud and the GKE_SA_KEY is the service account key.
Author: Benito Martin
Step 8: App Deployment
File name: build_deploy.yaml
Next, it is time to deploy our app and test it on a production environment. For this we will need additionally the Dockerfile that will be used together with GitHub actions:
With the GitHub Actions workflow configured, the app deployment process becomes automated. If we push changes to the main branch, the workflow will:
- Checkout: Checks out the repository code.
- Setup gcloud CLI: Authenticates with Google Cloud using the provided service account key.
- Configure Docker: Configures Docker to use Google Cloud as a credential helper.
- Get GKE Credentials: Fetches the GKE cluster credentials.
- Build Docker Image: Builds the Docker image for the application.
- Publish Docker Image: Pushes the Docker image to Google Artifact Registry
- Set up Kustomize: Downloads and sets up Kustomize.
- Create or Update Secrets: Creates or updates Kubernetes secrets in the GKE cluster.
- Deploy: Uses Kustomize to deploy the Docker image to the GKE cluster and checks the deployment status.
This setup ensures an automated, scalable, and secure deployment process for the application on GKE.
Note that to add more GitHub repositories, you can also integrate and automate the Qdrant indexing process with GitHub Actions by using a Helm Chart to run Qdrant in your Kubernetes cluster and creating a Kubernetes Job manifest to run the create_qdrant_collection.py.
Step 9: Kubernetes Check Up
The deployment might take 10–20 minutes to finish, but we can monitor the status of the deployment with some commands, once the deploy step of the build_deploy.yaml is triggered. Some useful commands to check the status are:
In the below screenshot, we can see some of these commands. I let the cluster run for a few hours to ensure that everything works properly. For example, we can see that at one point, a pod was not ready, and it took a few minutes to be created. Most likely, it crashed, and a new one was being generated, which shows that the cluster is performing correctly when something goes wrong.
Author: Benito Martin
Additionally, we can see that the memory being used (around 500Mi) fits perfectly within the specification, as we set up a minimum of 2Gi and a maximum of 12Gi, and we have enough CPU. Originally, we deployed 5 nodes and set up 2 to 10 pods for horizontal autoscaling. The system is working with 2 nodes and 2 pods, so the autoscaling works as well, as the system scaled down the nodes from 5 to 2.
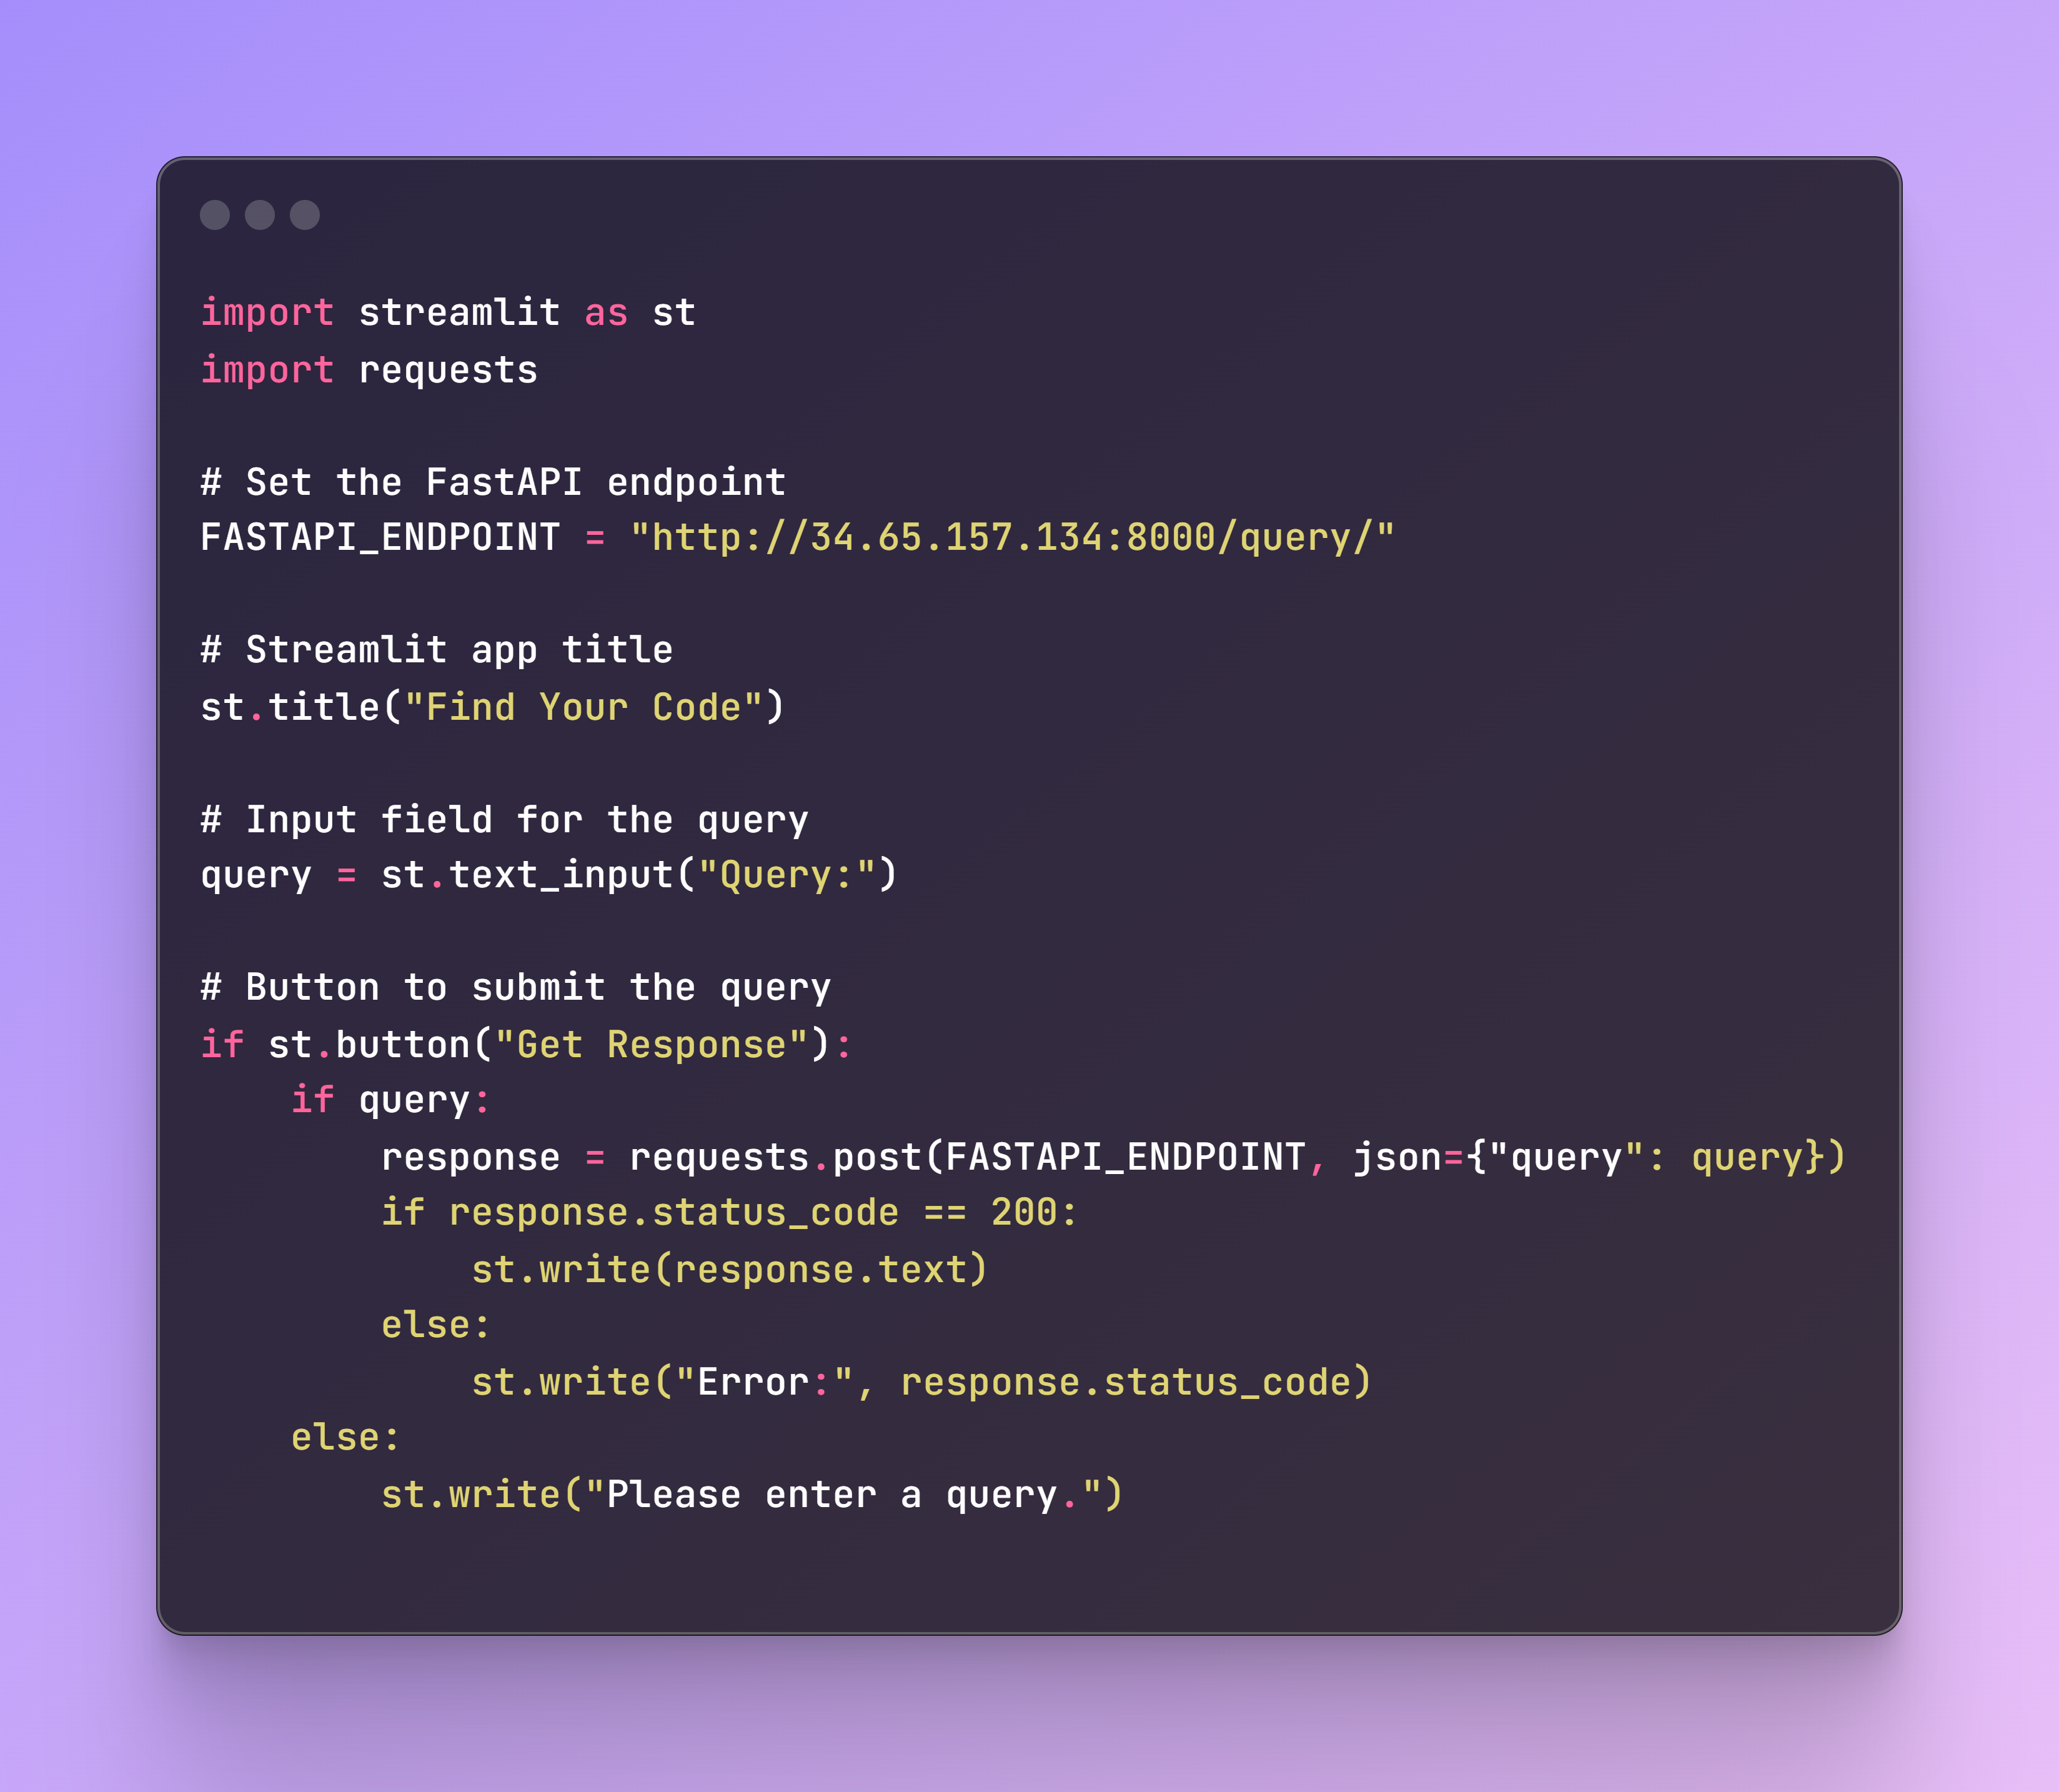
Step 10: Streamlit App
File name: streamlit_app.py
Finally, let’s build a Streamlit app to interact with our GitHub code! To know the endpoint, you have to take the EXTERNAL-IP of the service, as shown in the previous screenshot, and add it into the Streamlit app file.
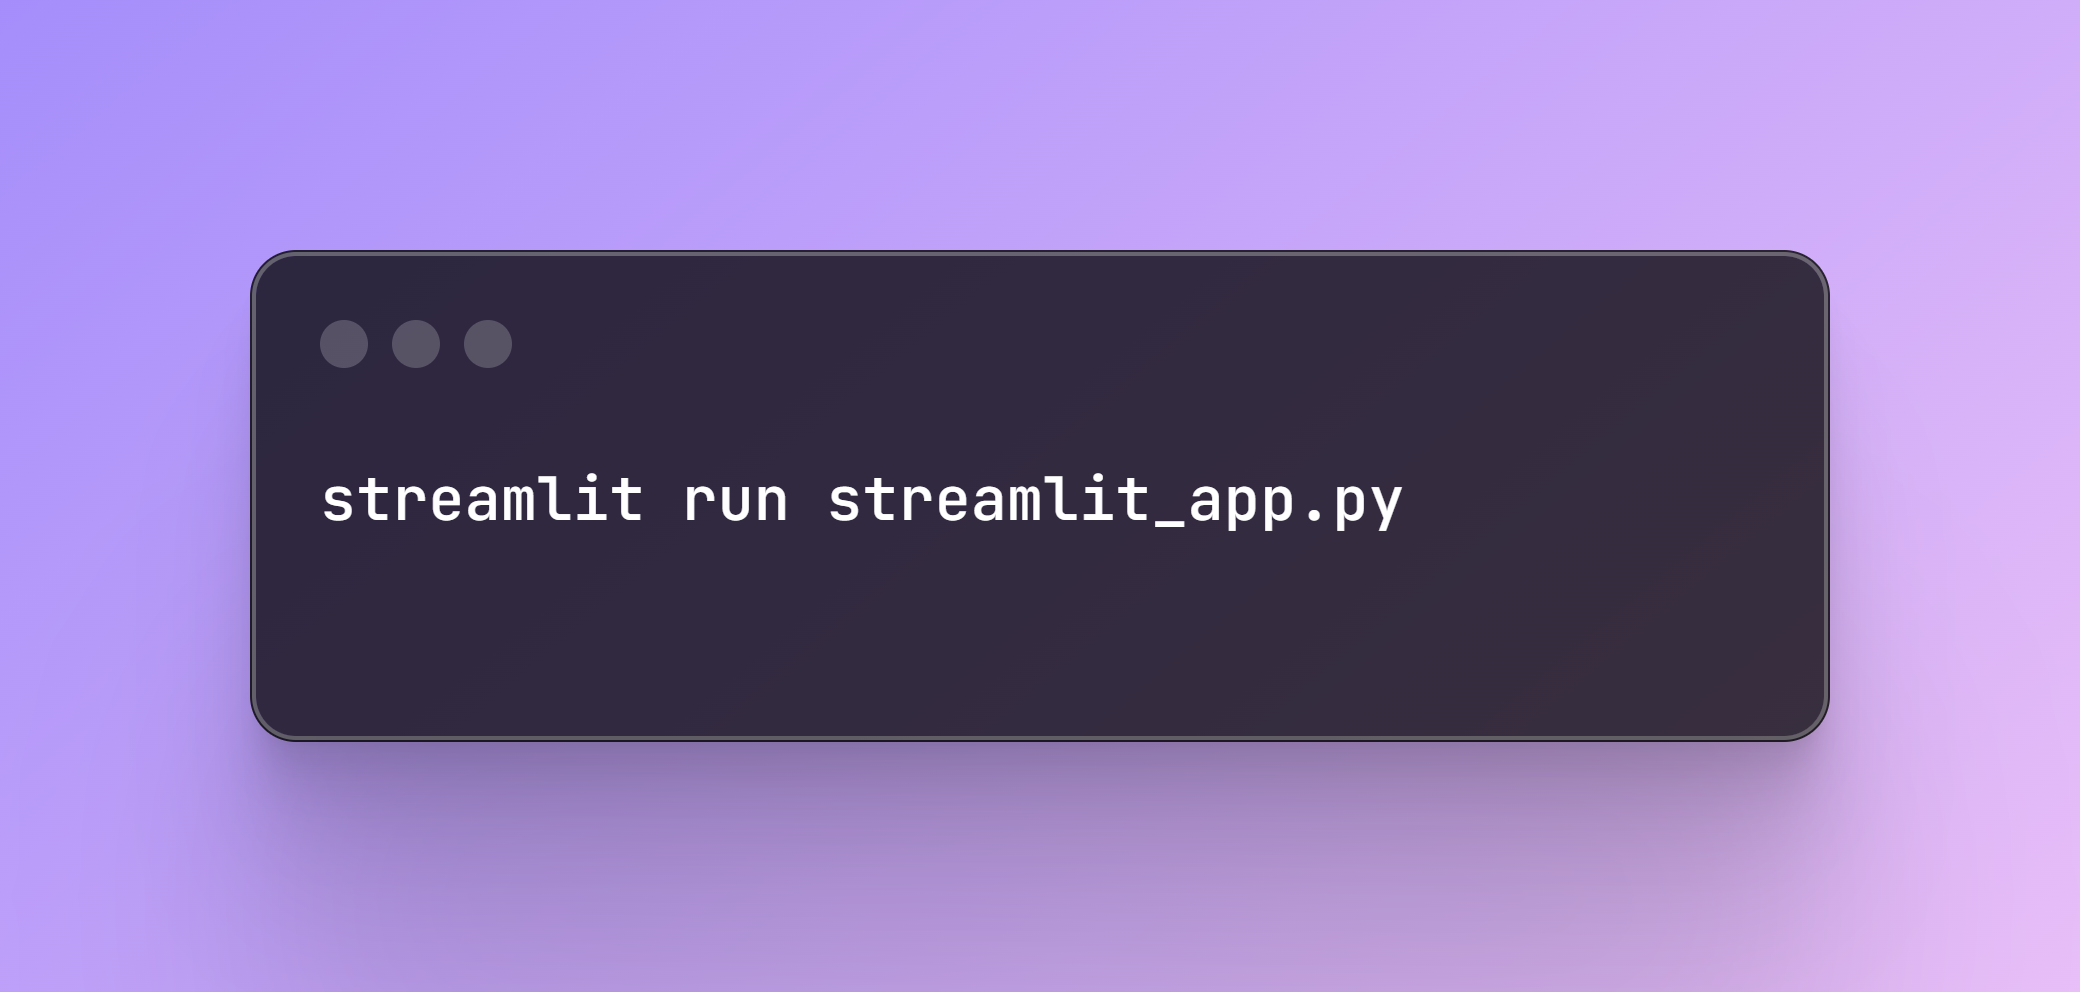
To run the Streamlit app, use the following command in the terminal:
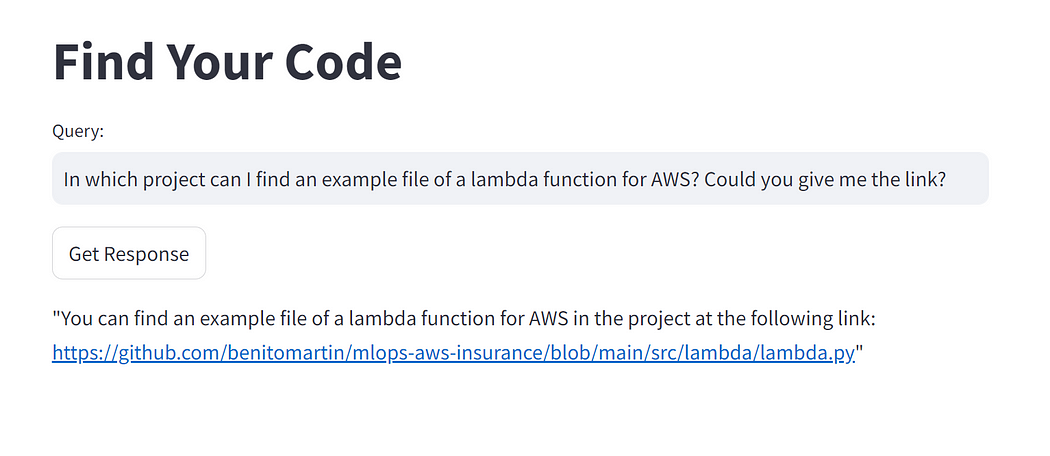
Now you can interact with the app and find your code!
Author: Benito Martin
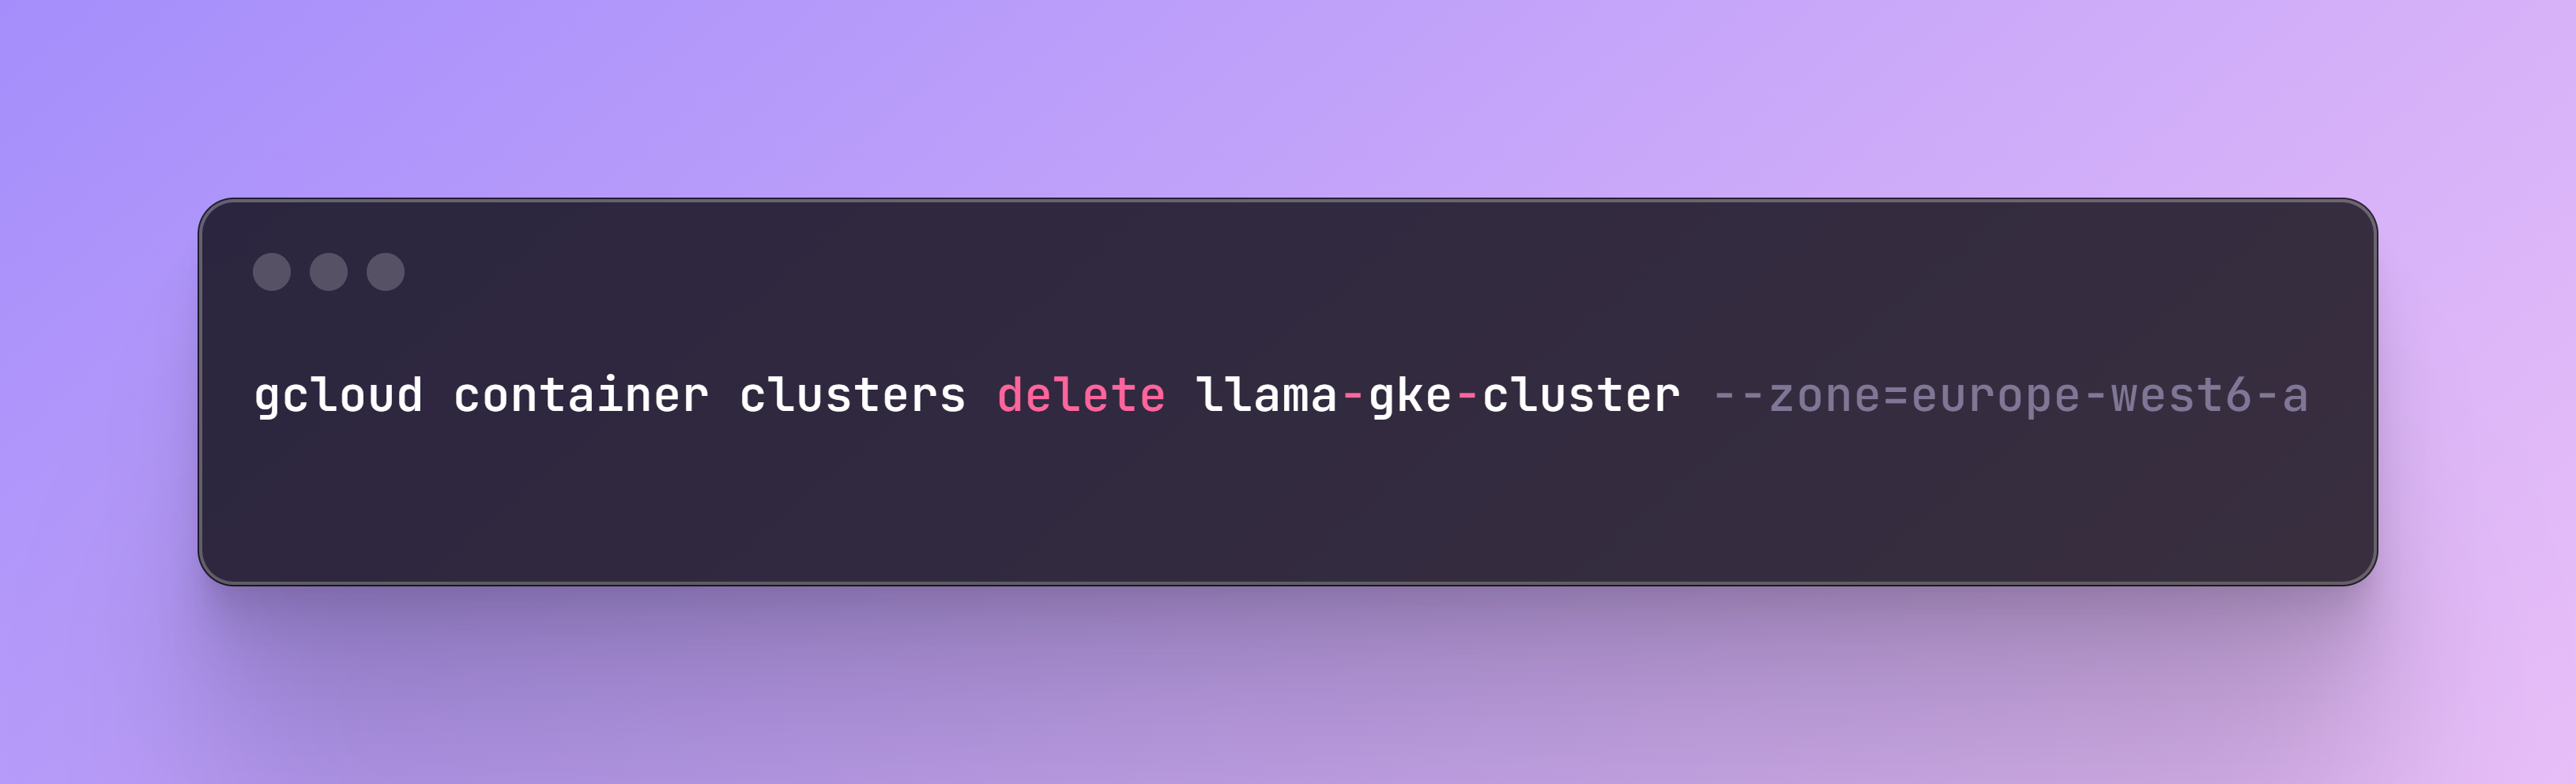
Step 11: Kubernetes Clean Up
Once you no longer need the app, you can delete it with the following command and remove the Docker image stored under the Artifact Registry in Google Cloud.
Conclusion
In this post, we walked through building, deploying, and scaling an LLM application using Kubernetes, LlamaIndex, and Qdrant to interact with your code. We created Python and YAML scripts to extract the relevant files, upload them into a Qdrant Collection, and deploy the app with various memory, resource, and scaling specifications. Additionally, we built a Streamlit app for user interaction.
If you enjoyed reading this content you can support it by:
- Clapping and following me on Medium! 👏 👏 👏
- Follow my Github 🎶 🎷 🎶
- Staring the repo ⭐⭐⭐
- Share my content on LinkedIn! 💯💯💯
Thank you for following along, and happy coding!
Originally posted at:
Dive in
Related
Blog
Building a Serverless Application with AWS Lambda and Qdrant for Semantic Search
By Benito Martin • Jul 2nd, 2024 • Views 1.5K
Blog
mAIdAI: Building a Personal Assistant with Google Cloud and Vertex AI
By Médéric Hurier • Mar 10th, 2026 • Views 112
Video
From Notebook to Kubernetes: Scaling GenAI Pipelines with ZenML // Alex Strick van Linschoten // DE4AI
By Alex Strick van Lins... • Sep 17th, 2024 • Views 478
Blog
Make your MLOps code base SOLID with Pydantic and Python’s ABC
By Médéric Hurier • Mar 20th, 2024 • Views 482
Blog
Building a Serverless Application with AWS Lambda and Qdrant for Semantic Search
By Benito Martin • Jul 2nd, 2024 • Views 1.5K
Video
From Notebook to Kubernetes: Scaling GenAI Pipelines with ZenML // Alex Strick van Linschoten // DE4AI
By Alex Strick van Lins... • Sep 17th, 2024 • Views 478
Blog
Make your MLOps code base SOLID with Pydantic and Python’s ABC
By Médéric Hurier • Mar 20th, 2024 • Views 482
Blog
mAIdAI: Building a Personal Assistant with Google Cloud and Vertex AI
By Médéric Hurier • Mar 10th, 2026 • Views 112